Month: July 2025

NEW Cruisin’ Carol on Vacation!

Hello and Welcome!!!
Watch video tutorial here!!!

Today, I’m excited to show you another brand-new set from the new release of all 5 of the active ladies! We will be using the Cruisin’ Carol Set (6075) on today’s card. Keep in mind that each of the sets include a little lady and several sentiments and the coordinating dies. The collection includes Crusin’ Carol, Birdie Betty, Loungin’ Linda, Gardener Gail, Pickleball Patty … and I just love them all and all of their cute names! There are also some scenic paper packs that coordinate with each of the ladies. These are perfect for creating a quick backdrop for your cards!

Here are the new ladies and the links to the bundle which includes all 5 stamp sets and all 5 coordinating paper packs. This is a great deal if you are interested in collecting all of the sets because the bundle is currently 25% off! Please note that these ladies can also be purchased separately as well and are also listed on the website. Here is the link for the Art Impressions People Bundle (c6102): https://shrsl.com/4xg76

Art Impressions People Bundle (c6102) includes:

  • 6074 – Pickleball Patty – with 4 sporty sentiments and matching die
  • 6075 – Cruisin’ Carol – tropical vacation vibes and matching die
  • 6076 – Gardener Gail – floral fun with 5 clever garden sentiments
  • 6077 – Loungin’ Linda – poolside sass and sunny sayings
  • 6080 – Birdie Betty – for the golf lovers, swingin’ into retirement
  • 6097–6101 Paper Packs – 5 themed A2-size cardstock packs that perfectly match each character (Pickleball, Cruise, Garden, Lounge, Golf)

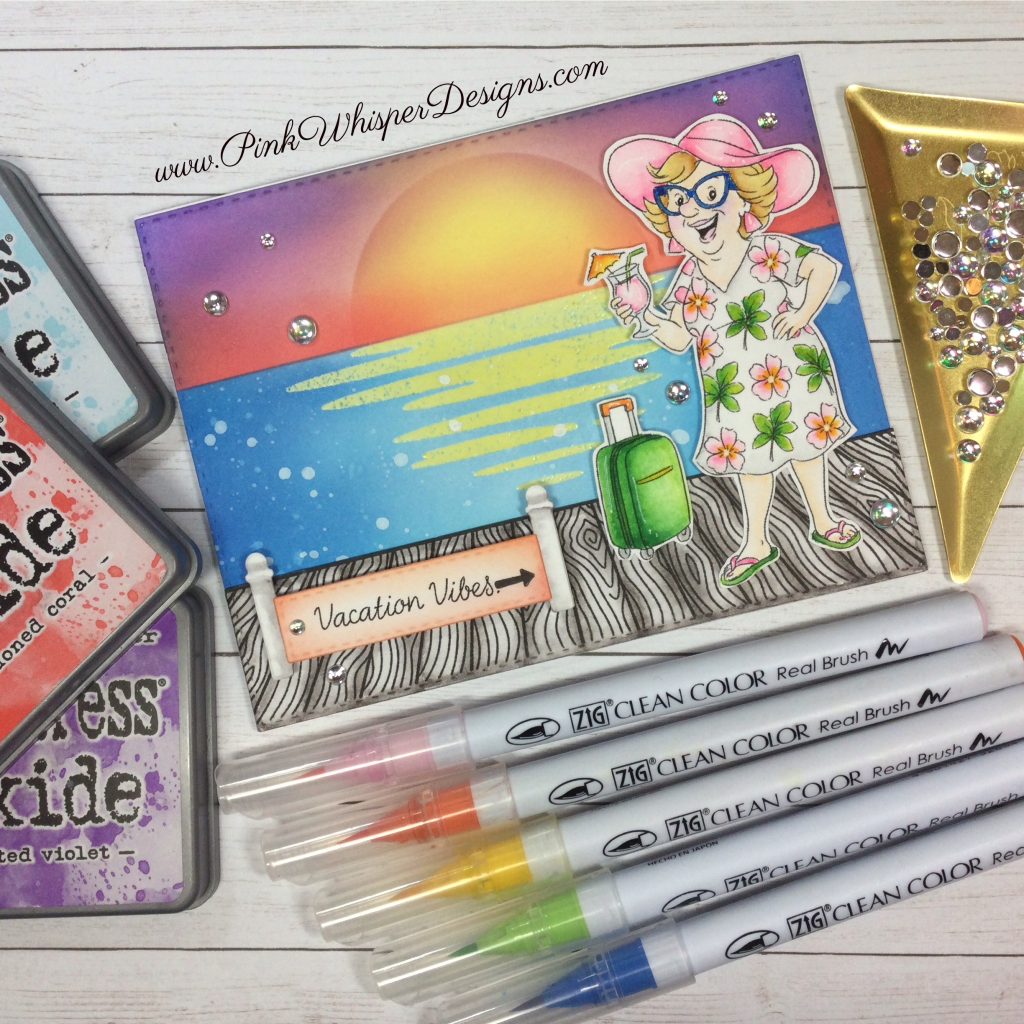
Let’s begin by creating our own background of sky and ocean using a fun and easy stencil set. I’ll show you how we can emboss the reflection on the ocean which will create a resist so that we can easily ink the blue of the ocean and create a nice shine to the reflection at the same time. We will use several Tim Holtz Distress Inks for ink blending the background. We will also spatter the ocean with white ink and water for added interest!

Now we will stamp a boardwalk for Crusin’ Carol to stand on and for our “Vacation Vibes” signpost. We can quickly color this in using the Zig Clean Color Real Brush Pen in Platinum Brown.

Let’s stamp Carol and her suitcase and color them as well, using those same markers in the following colors: Blender, Sugared Almond Pink, Lt Pink, Flesh Colour, Pale Yellow, Yellow, Orange, Mustard, Haze Blue, Persian Blue, Lime Green, Summer Green, Lt Gray.

To create the signpost, we will use the brand-new Journal Fence Dies (5807). We are going to cut this down a little bit to make it look more like a signpost than a fence. I’ll show you how to do that in the video as well.

Let’s quickly assemble the card and pop-up Carol, her luggage, and the signpost. We can also add a bit of sparkle to the card with a few iridescent gems!

Now that Carol has arrived at her destination, she can enjoy a drink and some fun vacation vibes!

If you enjoyed this video, you may enjoy the video that I recently released using Birdie Betty (the golfer), and I will link that here for you:

Thank you so much for joining me today! If you enjoyed today’s video, please select the Like and Subscribe buttons and don’t forget to hit that notification bell so that you don’t miss a single video!

All of the supplies used in today’s video are listed below. Click the products below to make a purchase. Where available I use compensated affiliate links which are at no additional costs to you.

Art Impressions Cruisin’ Carol (6075)

— https://shrsl.com/4xg5k (artimpressions.com)

Art Impressions Journal Fence Dies (5807)

— https://shrsl.com/4xg65 (artimpressions.com)

Art Impressions Rectangle A2 Double Stitched Dies (5063)

— https://shrsl.com/4xg66 (artimpressions.com)

Art Impressions Portfolio Template Die Set (5952)

— https://shrsl.com/4xg67 (artimpressions.com)

Dr. Ph. Martin’s Bleed Proof White Ink

— https://shrsl.com/4xg68 (artimpressions.com)

Post-it Labeling and Cover-up Tape

— https://shrsl.com/4xg69 (artimpressions.com)

#0 Royal Round Brush

— https://shrsl.com/4xg6a (artimpressions.com)

Sunny Studio Clear Stamps – Sprawling Surfaces

— https://shrsl.com/4xg6c (Scrapbook.com)

Lawn Fawn Push Here Stamps

— https://shrsl.com/4xg77 (Scrapbook.com)

Lawn Fawn Stencil Set – Beach Sunset

— https://shrsl.com/4xg79 (Scrapbook.com)

Zig Clean Color Real Brush Pens

— https://shrsl.com/4xg82 (dickblick.com)

Tim Holtz Titanium Sheers 9.5″

— https://shrsl.com/4xg7a (Scrapbook.com)

Tim Holtz Oxide Ink Pad – Abandoned Coral

— https://shrsl.com/4xg7b (Scrapbook.com)

Tim Holtz Oxide Ink Pad – Tumbled Glass

— https://shrsl.com/4xg7c (Scrapbook.com)

Tim Holtz Oxide Ink Pad – Blueprint Sketch

— https://shrsl.com/4xg7d (Scrapbook.com)

Tim Holtz Oxide Ink Pad – Squeezed Lemonade

— https://shrsl.com/4xg7e (Scrapbook.com)

Tim Holtz Oxide Ink Pad – Wilted Violet

— https://shrsl.com/4xg7f (Scrapbook.com)

Tim Holtz Oxide Ink Pad – Salty Ocean

— https://shrsl.com/4xg7g (Scrapbook.com)

Tim Holtz Paper Trimmer 8.5″

— https://shrsl.com/4xg7h (Scrapbook.com)

Tim Holtz Distress Sprayer

— https://shrsl.com/4xg7i (Scrapbook.com)

Scrapbook.com 3D Foam Squares – Lg 2mm

— https://shrsl.com/4xg7j (Scrapbook.com)

Ranger Embossing Powder – Clear

— https://shrsl.com/4xg7k (Scrapbook.com)

Ranger Heat it Craft Tool

— https://shrsl.com/4xg7l (Scrapbook.com)

MISTI Mini

— https://shrsl.com/4xg7m (Scrapbook.com)

Dress My Craft Mini Scoreboard

— https://shrsl.com/4xg7n (Scrapbook.com)

Tombow Mono Power Mini Glue Tape

— https://shrsl.com/4xg7o (Scrapbook.com)

Hero Arts Blending Brush – sm

— https://shrsl.com/4xg7p (Scrapbook.com)

Hero Arts Blending Brush – md

— https://shrsl.com/4xg7q (Scrapbook.com)

Pinkfresh Studio Clear Drops – Iridescent

— https://shrsl.com/4xg7s (Scrapbook.com)

Sakura Gelly Roll Gel Pens – White

— https://shrsl.com/4xg7t (Scrapbook.com)

Versafine Onyx Black Ink Pad

— https://shrsl.com/4xg7u (Scrapbook.com)

Spellbinders Platinum Scout Die Cutting Machine

— https://shrsl.com/4xg7v (Scrapbook.com)

Wendy Vecchi Make-art Stay-tion

— https://shrsl.com/4xg7w (Scrapbook.com)

Nuvo Deluxe Adhesive

— https://shrsl.com/4xg7x (Scrapbook.com)

We R Makers Detail Scissors

— https://shrsl.com/4xg7y (Scrapbook.com)

Strathmore Bristol Smooth 100lb Cardstock

— https://shrsl.com/4xg7z (dickblick.com)

Cricut Weeding Tool Kit

— https://shrsl.com/4xg80 (dickblick.com)

Marvy Jewel Picker

— https://shrsl.com/4xg81 (dickblick.com)

CHRISTMAS IN JULY – Layering Stencils, Vellum, and Rub-on Techniques – Snowflake!

Hello and Welcome!!!

Watch video tutorial here!!!

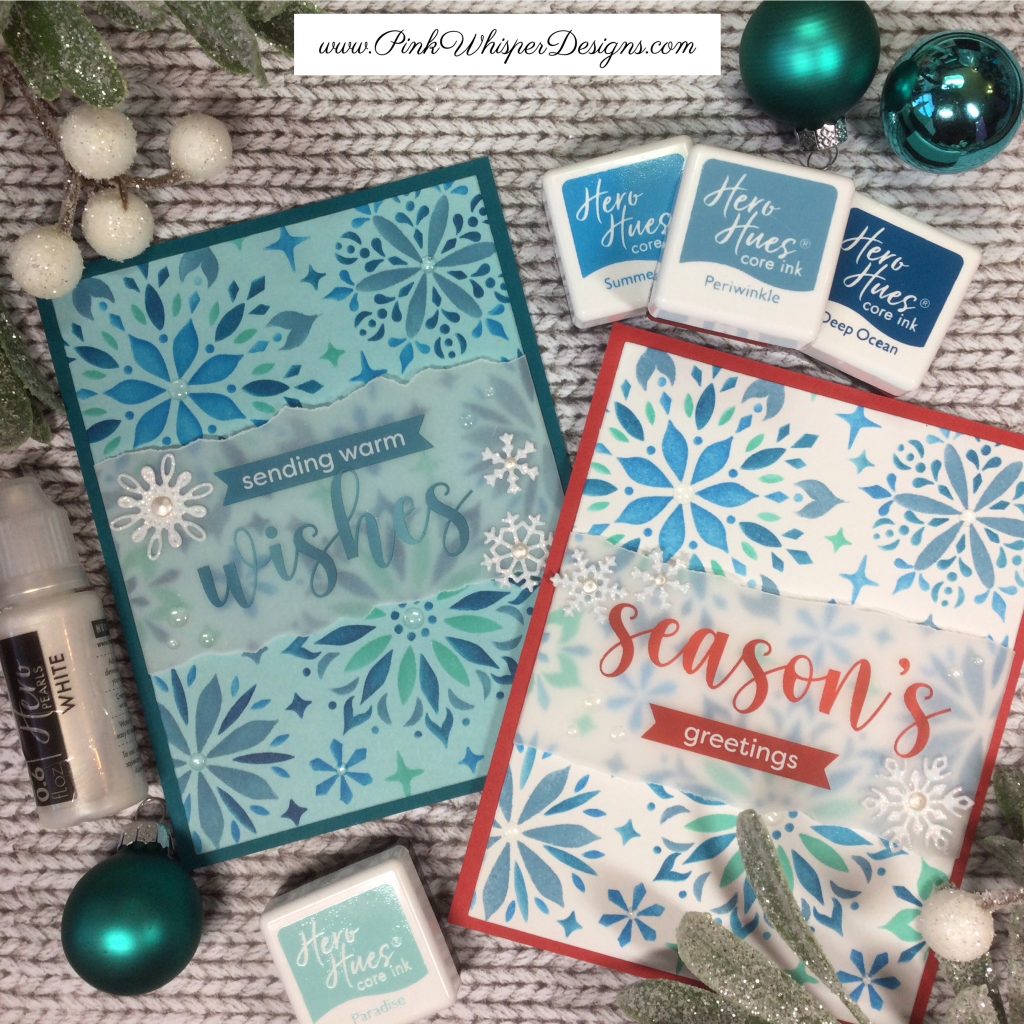
I’ve got some fun CHRISTMAS IN JULY vellum overlay cards to show you today! We will be using the wonderful Hero Arts “Snowflake” Layering Stencil Set to create an elegant background. This video is sort of a Part Two to another video I did recently using the Hero Arts “Poinsettia” Layering Stencil Set, and I will link that down below for you if you would like to check that out!

Let’s begin by die-cutting a rectangle from some white cardstock and a second panel using some blue cardstock. To die-cut the panels we will be using the Hero Arts Infinity Rectangle Die Set. Now we can begin our stenciling. This Hero Arts Stencil is a 4-part layering stencil. For both of these cards we will be using the Hero Arts Core Inks in several pretty blue tones. So we will use the same colors, however, by changing the cardstock base color we will get two completely different looks!

I’ll show you exactly how I inked these stencils in today’s video and give you some easy tricks and tips for adding color and blending.

Once the stenciling is complete, we will cut the vellum overlay. To do this, we will simply cut a strip of vellum paper approximately 2 3/4″ by 5 1/2″. Next, let’s add some fun Hero Arts “Joyful Christmas Messages” Hero Transfers to each of the cards in the coordinating colors. This set of transfers has tons of sentiments to choose from! We can also complete the inside of each of the cards with these same transfers/rub-ons.

Now simply tear the edges of the vellum and secure it with some double-sided tape on the backside of the snowflake panel. This will hide the adhesive really well!

For a bit more interest and dimension, let’s add some Hero Arts Hero Hues – Enamel Dots around each of the sentiments.

As a finishing touch, we can add some pretty white sparkly snowflakes using some glitter paper. Let’s also add some of the Hero Hues Pearls in white to the center of each of the snowflakes!

Here is the other video that I mentioned earlier if you would like to check it out:

Thank you so much for joining me today! If you enjoyed today’s video, please select the Like and Subscribe buttons and don’t forget to hit that notification bell so that you don’t miss a single video!

All of the supplies used in today’s video are listed below. Click the products below to make a purchase. Where available I use compensated affiliate links which are at no additional costs to you.

Hero Arts Color Layering Stencils – Snowflake

— https://shrsl.com/4ry8n (Scrapbook.com)

Hero Arts Hero Transfers – Rub-ons – Joyful Christmas Messages

— https://shrsl.com/4ry5z (Scrapbook.com)

Hero Arts Hero Hues – Enamel Dots – Clear

— https://shrsl.com/4ry60 (Scrapbook.com)

Hero Arts Infinity Dies – Rectangles

— https://shrsl.com/4ry7i (Scrapbook.com)

Hero Arts Blending Brushes – Small

— https://shrsl.com/4ry63 (Scrapbook.com)

Hero Arts – Hero Hues – Ink Cubes Pack – Core – Sea Blues

— https://shrsl.com/4ry7k (Scrapbook.com)

Hero Arts – Hero Hues – Ink Cubes Pack – Core – Sky Blues

— https://shrsl.com/4ry7m (Scrapbook.com)

Hero Arts – Hero Hues – Ink Cubes Pack – Core – Aquas

— https://shrsl.com/4ry7q (Scrapbook.com)

Hero Arts – Hero Hues – Premium Cardstock – 8.5 x 11 – Cherry – 10 Pack

— https://shrsl.com/4ry7w (Scrapbook.com)

Hero Arts – Hero Hues – Premium Cardstock – 8.5 x 11 – Arctic – 10 Pack

— https://shrsl.com/4ry7v (Scrapbook.com)

Hero Arts – Hero Hues – Premium Cardstock – 8.5 x 11 – Bermuda – 10 Pack

— https://shrsl.com/4ry7t (Scrapbook.com)

Scrapbook.com – Smooth Vellum Sheets – White – 8.5×11 – 40lb – 20 Pack

— https://shrsl.com/4ry66 (Scrapbook.com)

Concord and 9th – 8.5 x 11 Glitter Paper – White – 6 Pack

— https://shrsl.com/4ry82 (Scrapbook.com)

Hero Arts Hero Pearls – White

— https://shrsl.com/4ry83 (Scrapbook.com)

Art Impressions Snowflake Frame Die Set (5782)

— https://shrsl.com/4ry8b (Scrapbook.com)

— https://shrsl.com/4ry8g (artimpressions.com)

Nuvo Deluxe Adhesive

— https://shrsl.com/4ry86 (Scrapbook.com)

Tim Holtz Titanium Shears 9.5″

— https://shrsl.com/4ry6e (Scrapbook.com)

Tim Holtz Distress Sprayer

— https://shrsl.com/4ry6f (Scrapbook.com)

Post-it Labeling and Cover-up Tape

— https://shrsl.com/4ry6n (artimpressions.com)

Strathmore Bristol Smooth 100lb Cardstock

— https://shrsl.com/4ry6o (dickblick.com)


Scalloped Oval Fun Flap Card!

Hello and Welcome!!!

Watch video tutorial here!!!

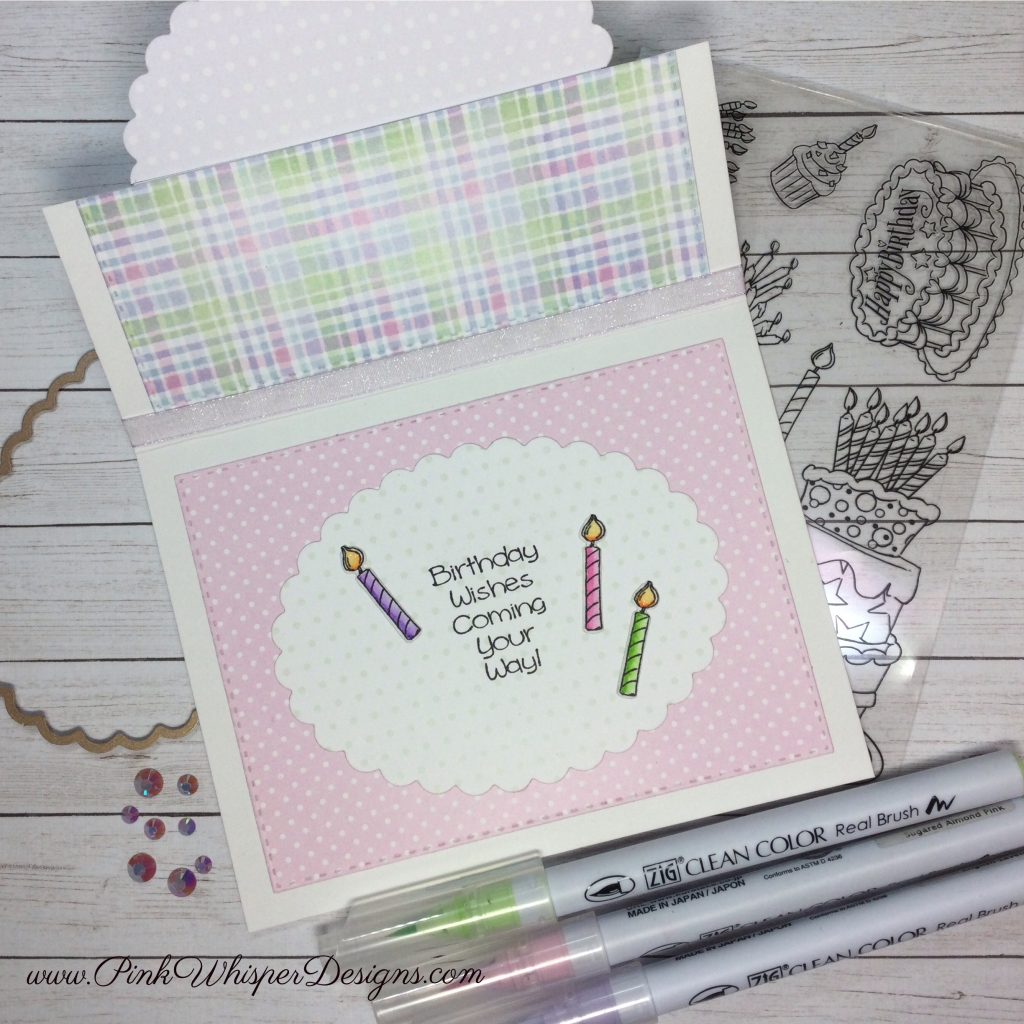
Let’s create a super fun Scalloped Oval Flap Birthday Card using the Ai Birthday Cake Set (5255). This set has lots of different cakes, a candle, and cupcake! This card was inspired by the current Ai “Let them eat cake” Blog Challenge which is to have some fun using a cake or cupcake on your card or project!

We will start by building the card base and layers for this card. I started with the card base to show you how this card design could be used for any of your images and can be easily changed into a holiday, birthday, or special occasion card by just changing out your patterned papers. We will be using the Ai Mother’s Day Paper Pack (6051) which is absolutely beautiful and will give us a festive, yet feminine look to our card.

I’ll show you exactly how to create the card base and layers in todays video! We will be using the brand-new Ai Scalloped Oval Die Set for the flap design. You will love this 9 piece oval die set. The largest oval has a detailed scallop look to it!

Once the card base and ovals have been assembled onto the card base, we can stamp our cake onto some smooth white cardstock and color it with our Zig Clean Color Real Brush Pens in the following colors: Blender, Sugared Almond Pink, Peach Pink, Pale Yellow, Orange, Pale Green, Lt Green, English Lavender, Violet, Lt Gray.

We can die cut this with the coordinating die and pop it up onto the center oval for some added dimension.

We can now die-cut another oval for the inside of the card using the sentiment that says, “Birthday Wishes Coming Your Way!” from the Ai Birthday Sentiments Set (5735). I’ll show you a little trick for lining this up perfectly behind the ovals on the front of the card in today’s video. Let’s stamp a few candles from this same set and attach them around the sentiment.

Next, let’s add a bit of sparkle using the Wink of Stella Clear Glitter Pen and a few lavender gems! As a finishing touch, we can add some lavender iridescent ribbon and tie a pretty bow!

Please join us in this new blog challenge …. we would love to see what you create!

Thank you so much for joining me today! If you enjoyed today’s video, please select the Like and Subscribe buttons and don’t forget to hit that notification bell so that you don’t miss a single video!

All of the supplies used in today’s video are listed below. Click the products below to make a purchase. Where available I use compensated affiliate links which are at no additional costs to you.

Art Impressions Birthday Cake Set (5255)

— https://shrsl.com/4xdo0 (artimpressions.com)

Art Impressions Scalloped Oval Dies (6046)

— https://shrsl.com/4xdo1 (artimpressions.com)

Art Impressions Nested Oval Dies (5727)

— https://shrsl.com/4xdo2 (artimpressions.com)

Art Impressions Rectangle A2 Double Stitched Dies (5063)

— https://shrsl.com/4xdo3 (artimpressions.com)

— https://shrsl.com/4xdoa (Scrapbook.com)

Art Impressions Birthday Sentiments Set (5735)

— https://shrsl.com/4xdo4 (artimpressions.com)

— https://shrsl.com/4xdob (Scrapbook.com)

Art Impressions Mini Birthday Sentiments Set (5866)

— https://shrsl.com/4xdo5 (artimpressions.com)

— https://shrsl.com/4xdoc (Scrapbook.com)

Art Impressions Mother’s Day Paper Pack (6051)

— https://shrsl.com/4xdo6 (artimpressions.com)

— https://shrsl.com/4xdod (Scrapbook.com)

Art Impressions WC Travel Box (4924)

— https://shrsl.com/4xdo7 (artimpressions.com)

Post-it Labeling and Cover-up Tape

— https://shrsl.com/4xdo8 (artimpressions.com)

Wink of Stella Glitter Pen – Clear

— https://shrsl.com/4xdo9 (artimpressions.com)

Zig Clean Color Real Brush Pens

— https://shrsl.com/4xdov (dickblick.com)

Pinkfresh Studio Brass Triangle Tray

— https://shrsl.com/4xdoe (Scrapbook.com)

Pinkfresh Studio Essential Jewels – Lavender

— https://shrsl.com/4xdof (Scrapbook.com)

Pinkfresh Studio Dual Tip Embellishment Tool

— https://shrsl.com/4xdog (Scrapbook.com)

Scrapbook.com 3D Foam Squares – Sm

— https://shrsl.com/4xdoh (Scrapbook.com)

Tim Holtz Titanium Shears 9.5″

— https://shrsl.com/4xdoi (Scrapbook.com)

Tim Holtz Paper Trimmer 8.5″

— https://shrsl.com/4xdoj (Scrapbook.com)

Tonic Studios – Tim Holtz – Media Ruler

— https://shrsl.com/4xdok (Scrapbook.com)

Spellbinders Platinum Scout Die Cutting Machine

— https://shrsl.com/4xdol (Scrapbook.com)

Spellbinders Platinum 6 Die Cutting Machine

— https://shrsl.com/4xdon (Scrapbook.com)

MISTI Mini

— https://shrsl.com/4xdoo (Scrapbook.com)

Nuvo Deluxe Adhesive

— https://shrsl.com/4xdop (Scrapbook.com)

Dress My Craft Mini Scoreboard

— https://shrsl.com/4xdoq (Scrapbook.com)

Versafine Onyx Black Ink Pad

— https://shrsl.com/4xdos (Scrapbook.com)

Cricut Weeding Tool Kit

— https://shrsl.com/4xdot (dickblick.com)

Strathmore Bristol Smooth 100lb Cardstock

— https://shrsl.com/4xdou (dickblick.com)


CHRISTMAS IN JULY – Layering Stencils, Vellum, and Rub-on Techniques – Poinsettia!

Hello and Welcome!!!

Watch video tutorial here!!!

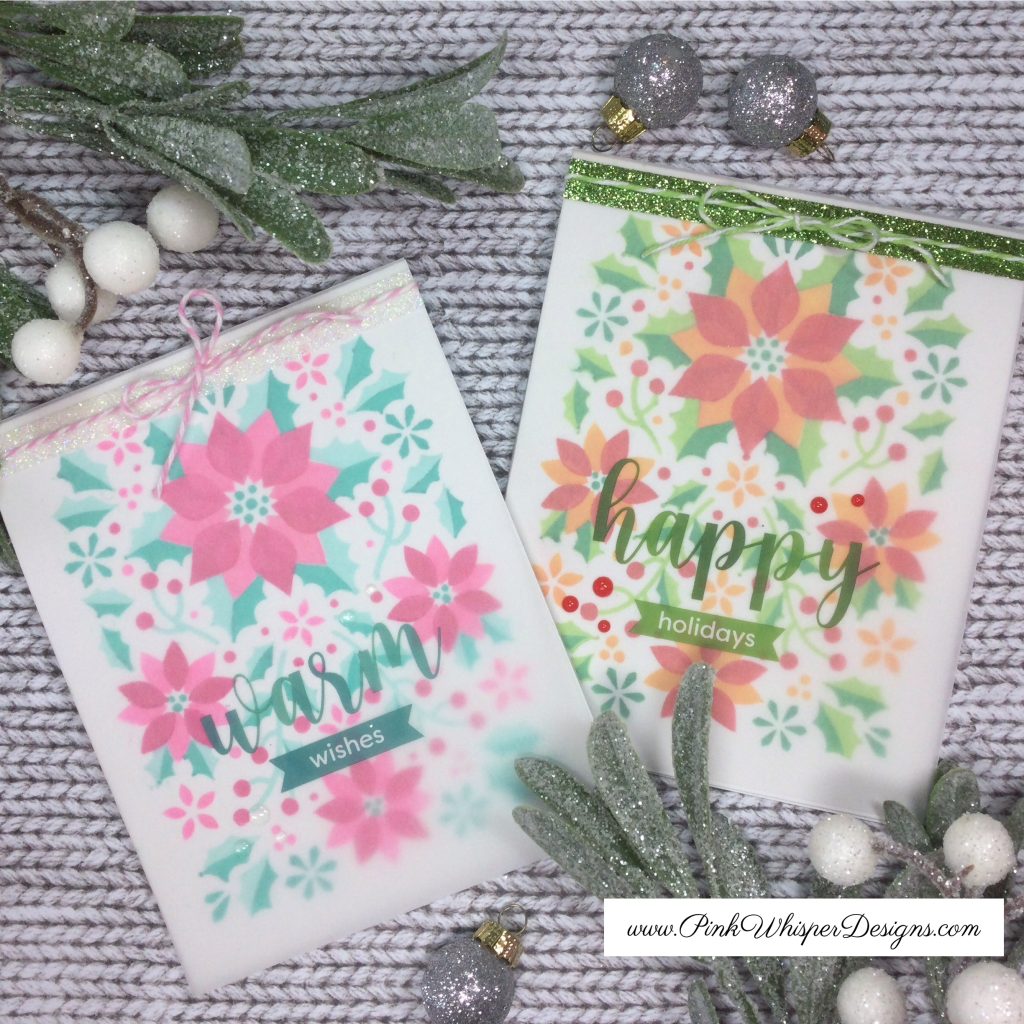
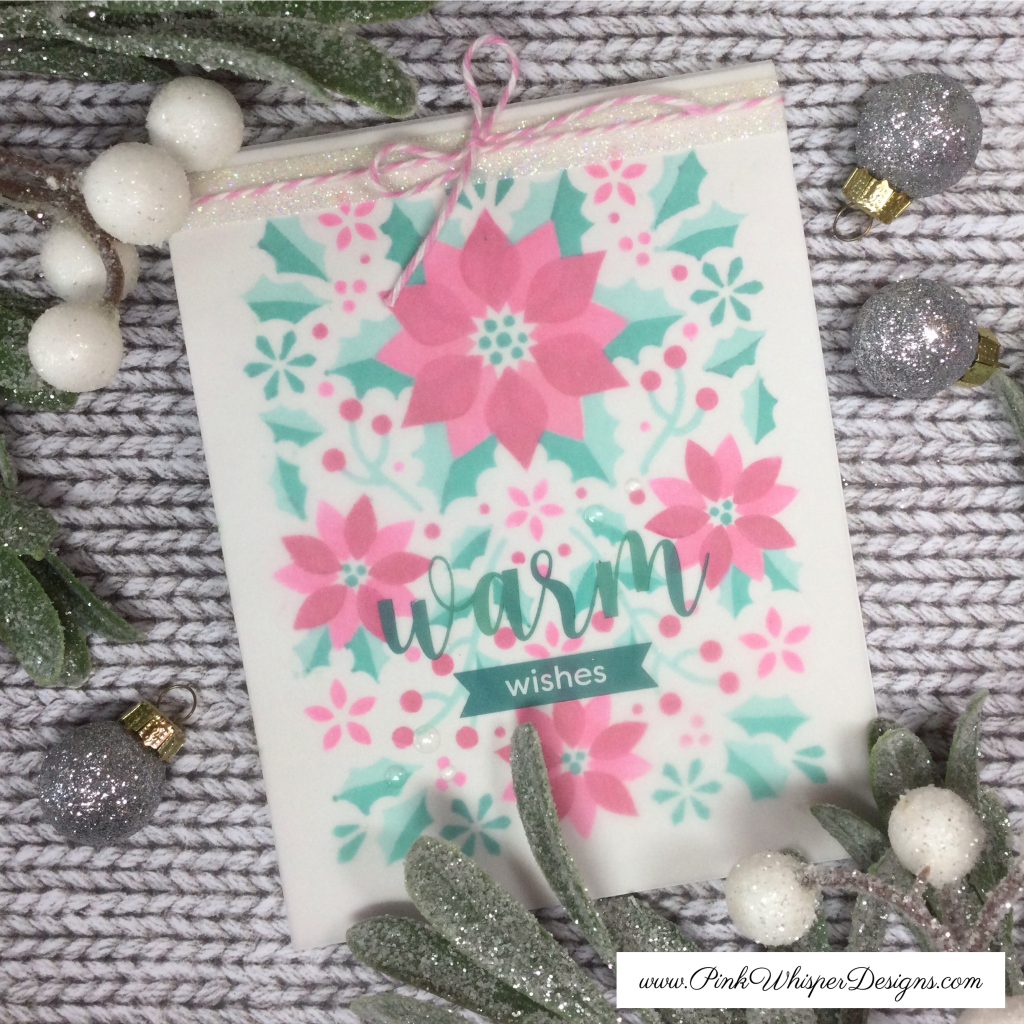
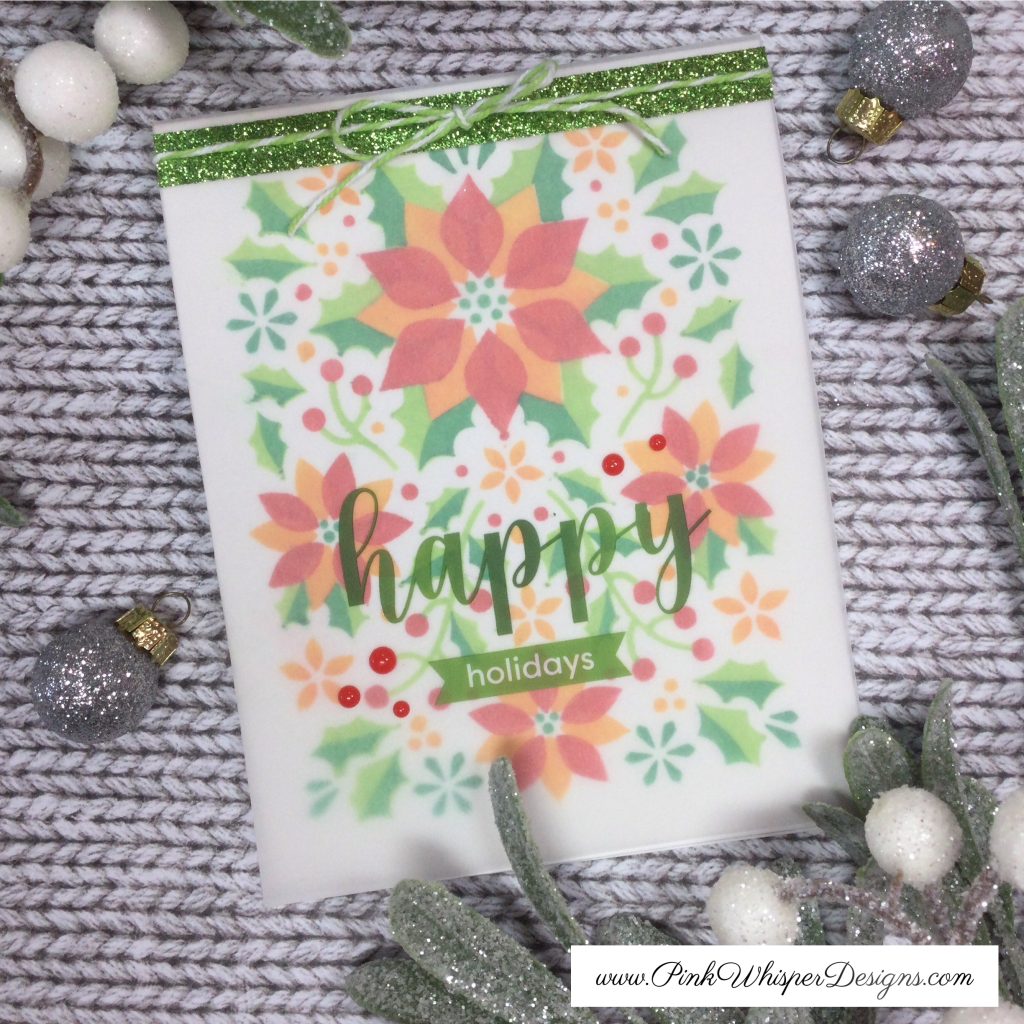
I’ve got some fun CHRISTMAS IN JULY vellum overlay cards to show you today! We will be using the wonderful Hero Arts “Poinsettia Pattern” Layering Stencil Set to create an elegant background.

Let’s begin by creating our standard A2 size top-folding card base and begin our stenciling. This Hero Arts Stencil is a 4-part layering stencil. For the first card we will be using some pretty pinks and turquoise colors and for the second card we will use some yellow/orange/red and green colors. The inks I will be using today are the Vicki Boutin Color Wheels in the warm and cool tones. The inks in the color wheel will be so easy to use and the pie shape ink pads will make it easier to do some simple color shadowing and layering.

I’ll show you exactly how I inked these stencils in today’s video and give you some easy tricks and tips for adding color and blending.

Once the stenciling is complete, we will add the vellum overlay. To do this, we will simply fold the vellum over the top of the entire card base and secure it with some double-sided tape at the very top of the front of the card. Now to hide that tape under the vellum, we will add a strip of sparkly washi tape onto the vellum panel.

Next, let’s add some fun Hero Arts “Joyful Christmas Messages” Hero Transfers to each of the cards in the coordinating colors. This set of transfers has tons of sentiments to choose from! We will also complete the inside of each of the cards with these same transfers/rub-ons.

For a bit more interest and dimension, let’s add some Hero Arts Hero Hues – Enamel Dots around each of the sentiments.

As a finishing touch, we can add some baker’s twine in the coordinating color and add a pretty bow!

Thank you so much for joining me today! If you enjoyed today’s video, please select the Like and Subscribe buttons and don’t forget to hit that notification bell so that you don’t miss a single video!

All of the supplies used in today’s video are listed below. Click the products below to make a purchase. Where available I use compensated affiliate links which are at no additional costs to you.

Hero Arts Color Layering Stencils – Poinsettia Pattern

— https://shrsl.com/4ry5w (Scrapbook.com)

Hero Arts Hero Transfers – Rub-ons – Joyful Christmas Messages

— https://shrsl.com/4ry5z (Scrapbook.com)

Hero Arts Hero Hues – Enamel Dots – Clear

— https://shrsl.com/4ry60 (Scrapbook.com)

Hero Arts Hero Hues – Enamel Dots – Sunset

— https://shrsl.com/4ry61 (Scrapbook.com)

Hero Arts Blending Brushes – Small

— https://shrsl.com/4ry63 (Scrapbook.com)

Vicki Boutin – Mixed Media – Color Stamp Pads – Cool

— https://shrsl.com/4ry5u (Scrapbook.com)

Vicki Boutin – Mixed Media – Color Stamp Pads – Warm

— https://shrsl.com/4ry5t (Scrapbook.com)

Scrapbook.com – Smooth Vellum Sheets – White – 8.5×11 – 40lb – 20 Pack

— https://shrsl.com/4ry66 (Scrapbook.com)

Altenew – Glitter Tape – Evergreen Elegance

— https://shrsl.com/4ry68 (Scrapbook.com)

Altenew – Glitter Tape – Moonstone

— https://shrsl.com/4ry6a (Scrapbook.com)

Doodlebug Design – Chunky Doodle Twine – Limeade

— https://shrsl.com/4ry6c (Scrapbook.com)

Pink and Main – Twine – Salon

— https://shrsl.com/4ry6d (Scrapbook.com)

Tim Holtz Titanium Shears 9.5″

— https://shrsl.com/4ry6e (Scrapbook.com)

Tim Holtz Distress Sprayer

— https://shrsl.com/4ry6f (Scrapbook.com)

Wendy V. Make Art Stay-tion

— https://shrsl.com/4ry6g (Scrapbook.com)

Fiskars 12″ Paper Trimmer

— https://shrsl.com/4ry6h (Scrapbook.com)

Dress My Craft – Non-Stick Bone Folder 1

— https://shrsl.com/4ry6i (Scrapbook.com)

Cricut Weeding Tool Kit

— https://shrsl.com/4ry6p (dickblick.com)

Sizzix Paper Sculpting Kit

— https://shrsl.com/4ry6j (Scrapbook.com)

We R Makers Detail Scissors

— https://shrsl.com/4ry6k (Scrapbook.com)

Lawn Fawn – Double Sided Tape – 1/8 Inch

— https://shrsl.com/4ry6l (Scrapbook.com)

Post-it Labeling and Cover-up Tape

— https://shrsl.com/4ry6n (artimpressions.com)

Strathmore Bristol Smooth 100lb Cardstock

— https://shrsl.com/4ry6o (dickblick.com)

Gina K Designs – Multi-Purpose Scoring Board Tool

— https://shrsl.com/4ry6m (Scrapbook.com)


Triangle Fun Fold Card – Queen of the Green!

Hello and Welcome!!!

Watch video tutorial here!!!

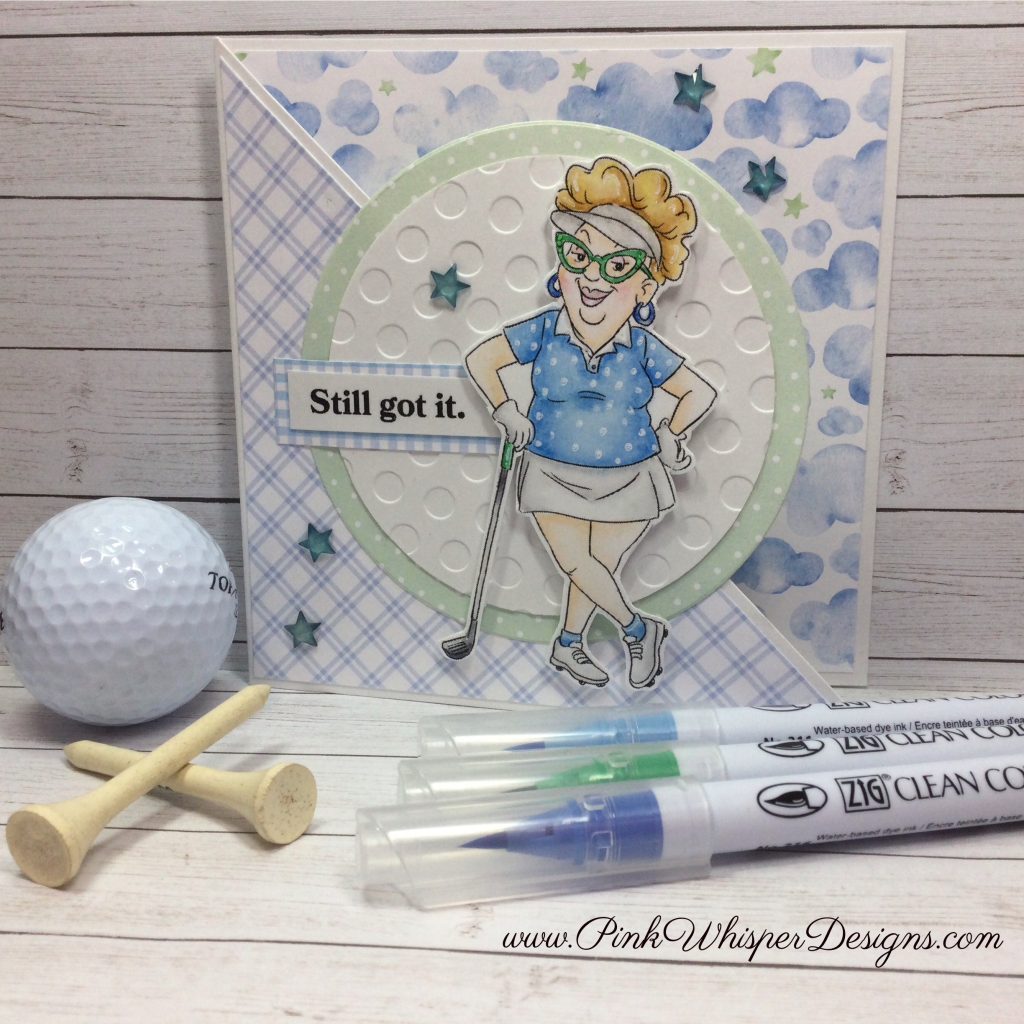
I’m so thrilled to be showing you the brand-new Ai Birdie Betty (6080) stamp set today! This adorable golfing lady is just extra cute and special. I know so many golfers that would love to receive a card with this little lady!

Also, there are four other brand-new stamp sets in this series as follows: Loungin’ Linda, Gardener Gail, Cruisin’ Carol. I will list and link all of these for you down below.

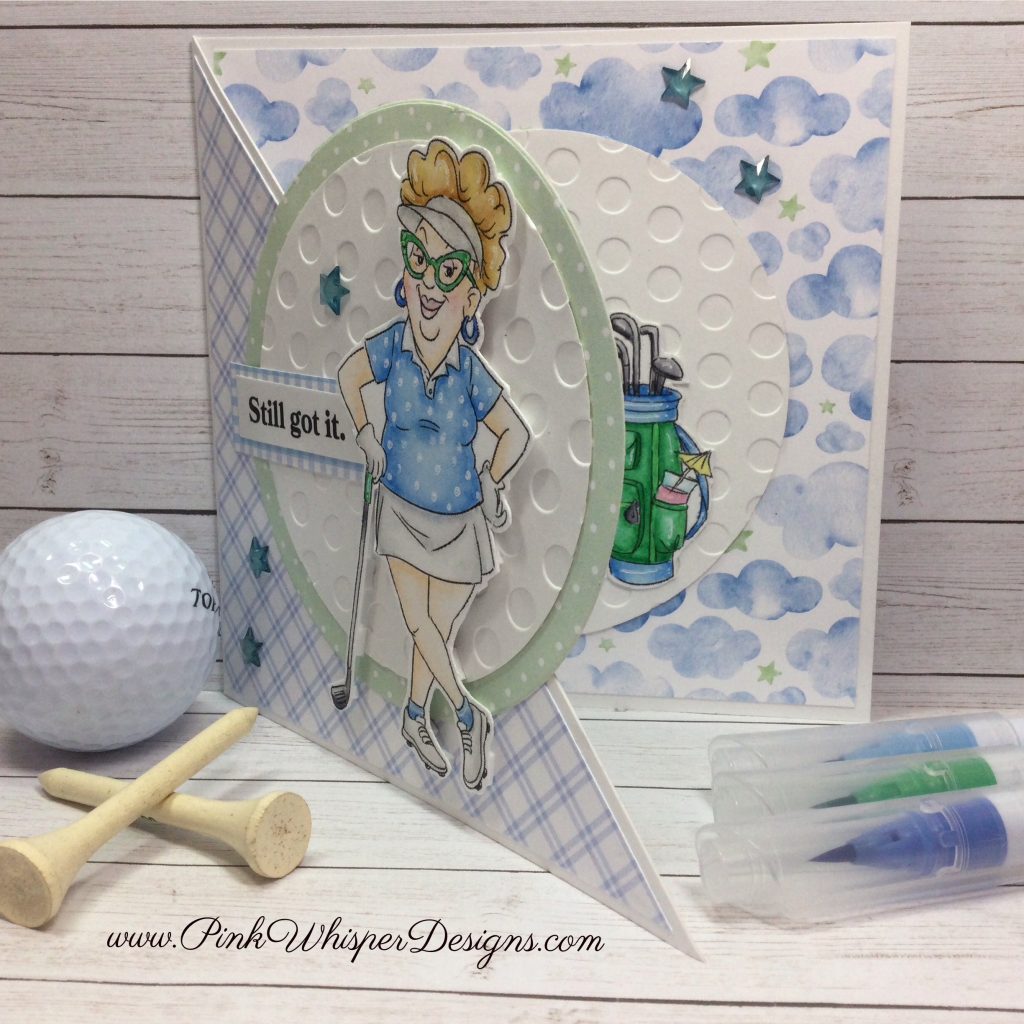
We will create a fun a triangle fun fold card using the Ai Baby Boy Paper Pack (6058). It’s always fun to look through your papers and see if you can use them in a new and different way. We will use the pretty cloudy and starry sky and some fun polka dots and plaids.

Let’s begin by creating the square card base and with some simple cutting we can create this triangle flap and coordinating layers. I’ll show give you the exact measurements and instructions in today’s video!

For the circle shapes, we will use the Ai Nested Circle Dies (5726) in a few different sizes. The larger one will be from some polka dot paper and the smaller one will be from some 100lb white cardstock … but to make this really fun we will emboss this circle with the “Lots of Dots” embossing folder and this will look just like a golf ball! You will actually want to use the back side of the embossed circle … those indented circles will perfectly mimic the texture of a real golf ball!

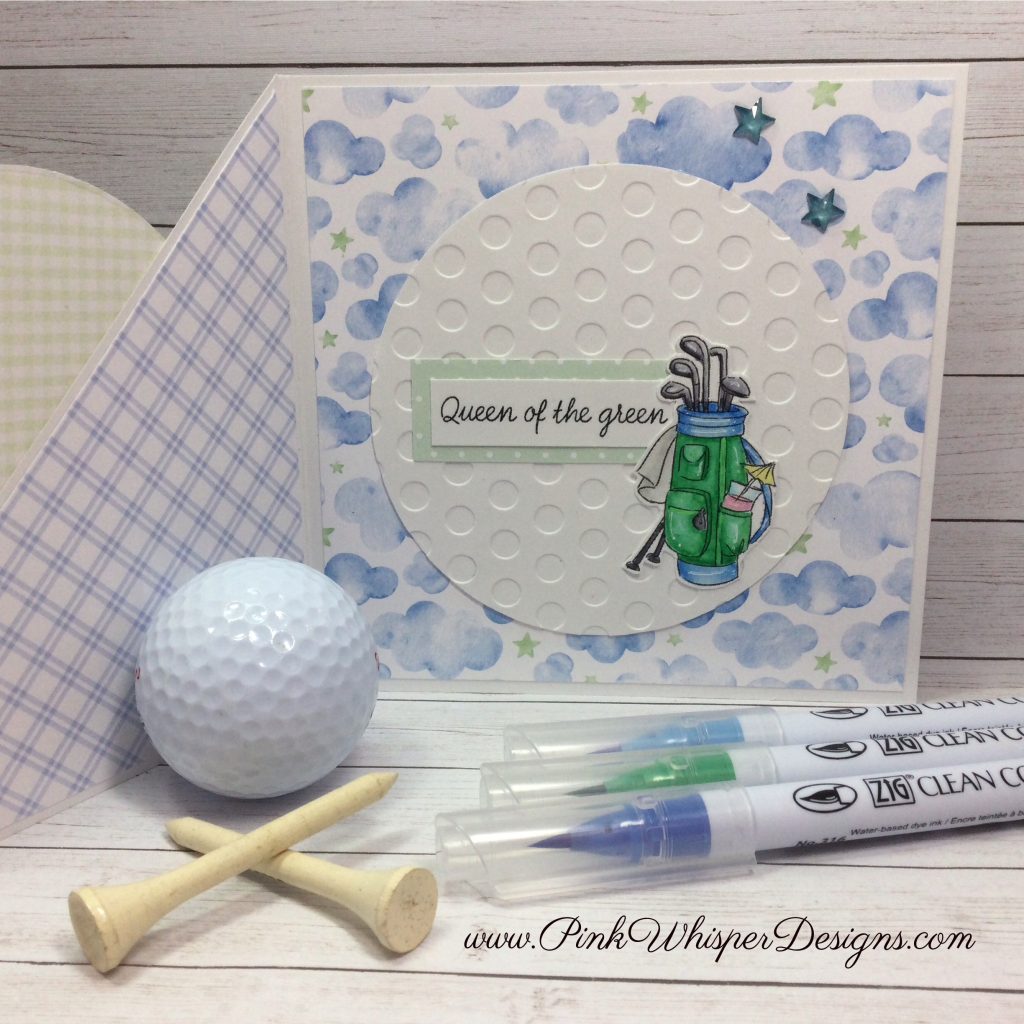
We will glue these two together and attach them to the front of the card. We will just be gluing one half of the circle to the triangle flap. What’s really nice is that the double-sided paper will give us a pretty pattern on the inside of the card as well.

Next, we can stamp, color and die-cut the lady and golf bag! All of today’s coloring was done using the Zig Clean Color Real Brush Pens in the following colors: Blender, Sugared Almond Pink, Pale Yellow, Flesh Colour, Beige, Ice Blue, Hyacinth Blue, Iris Blue, Emerald Green, Lt Gray, Gray.

We can grab a white gel pen and add some fun polka dots to her golf shirt and also add a few highlights!

Let’s also add a sentiment from this same set that says, “Still got it.” Simply cut this into a sentiment strip and add a bit of plaid paper to frame it nicely.

We can pop-up the little lady with some 3D Foam Squares for some added interest and dimension.

Going to the inside of the card we will die-cut another of the larger circle from that same die set and emboss that with the same dotted texture! I will show you a little trick for attaching this perfectly behind the circle on the front of the card.

Glue in another sentiment from that same set that says, “Queen of the Green” and frame that with some polka dotted paper. Now you can glue down the golf bag as well.

As a finishing touch, and to mimic the stars in the pattern paper, we will and some crystal stars in a pretty blue color!

This card design gives you a fun way to use your paper packs to create a unique card design! Do keep in mind that the square cards will require a bit more postage so be sure to ask your postal office about the difference in price. I usually just hand mine to the intended recipient when it is a square card so that I can avoid that all together!

Thank you so much for joining me today! If you enjoyed today’s video, please select the Like and Subscribe buttons and don’t forget to hit that notification bell so that you don’t miss a single video!

All of the supplies used in today’s video are listed below. Click the products below to make a purchase. Where available I use compensated affiliate links which are at no additional costs to you.

Ai Birdie Betty (6080)

— https://shrsl.com/4xc4z (artimpressions.com)

Ai Pickleball Patty (6074)

— https://shrsl.com/4xc6h (artimpressions.com)

Ai Loungin’ Linda (6077)

— https://shrsl.com/4xc56 (artimpressions.com)

Ai Gardener Gail (6076)

— https://shrsl.com/4xc57 (artimpressions.com)

Ai Cruisin’ Carol (6075)

— https://shrsl.com/4xc58 (artimpressions.com)

Art Impressions Nested Circle Dies (5726)

— https://shrsl.com/4x1xx (artimpressions.com)

— (Scrapbook.com)

Art Impressions Baby Boy Paper Pack (6058)

— https://shrsl.com/4xc59 (artimpressions.com)

— https://shrsl.com/4xc5a (Scrapbook.com)

Sunny Studio Embossing Folder – Lots of Dots 6″x6″

— https://shrsl.com/4xc5b (Scrapbook.com)

Wink of Stella Glitter Pen – Clear

— https://shrsl.com/4xc5d (artimpressions.com)

Zig Clean Color Real Brush Pens

— https://shrsl.com/4x1xi (dickblick.com)

Buttons Galore & More Sparkletz – Patriotic Stars

— https://shrsl.com/4xc5e (Scrapbook.com)

Pinkfresh Studio Brass Triangle Tray

— https://shrsl.com/4xc5h (Scrapbook.com)

Sakura Gelly Roll Pen – White

— https://shrsl.com/4xc5i (Scrapbook.com)

Fiskars 12″ Paper Trimmer

— https://shrsl.com/4xc5j (Scrapbook.com)

Dress My Craft Mini Scoreboard

— https://shrsl.com/4xc5k (Scrapbook.com)

Versafine Onyx Black Ink Pad

— https://shrsl.com/4xc5l (Scrapbook.com)

Scrapbook.com 3D Foam Squares – Sm

— https://shrsl.com/4xc5m (Scrapbook.com)

Tombow Mono Mini Glue Tape Runner

— https://shrsl.com/4xc5n (Scrapbook.com)

Nuvo Deluxe Adhesive

— https://shrsl.com/4xc5o (Scrapbook.com)

Marvy Jewel Picker

— https://shrsl.com/4x1xv (dickblick.com)

Cricut Weeding Tool Kit

— https://shrsl.com/4x1xw (dickblick.com)


Create a “FAUX” Large Background Die Using Your Border Dies!

Hello and Welcome!!!

Watch video tutorial here!!!

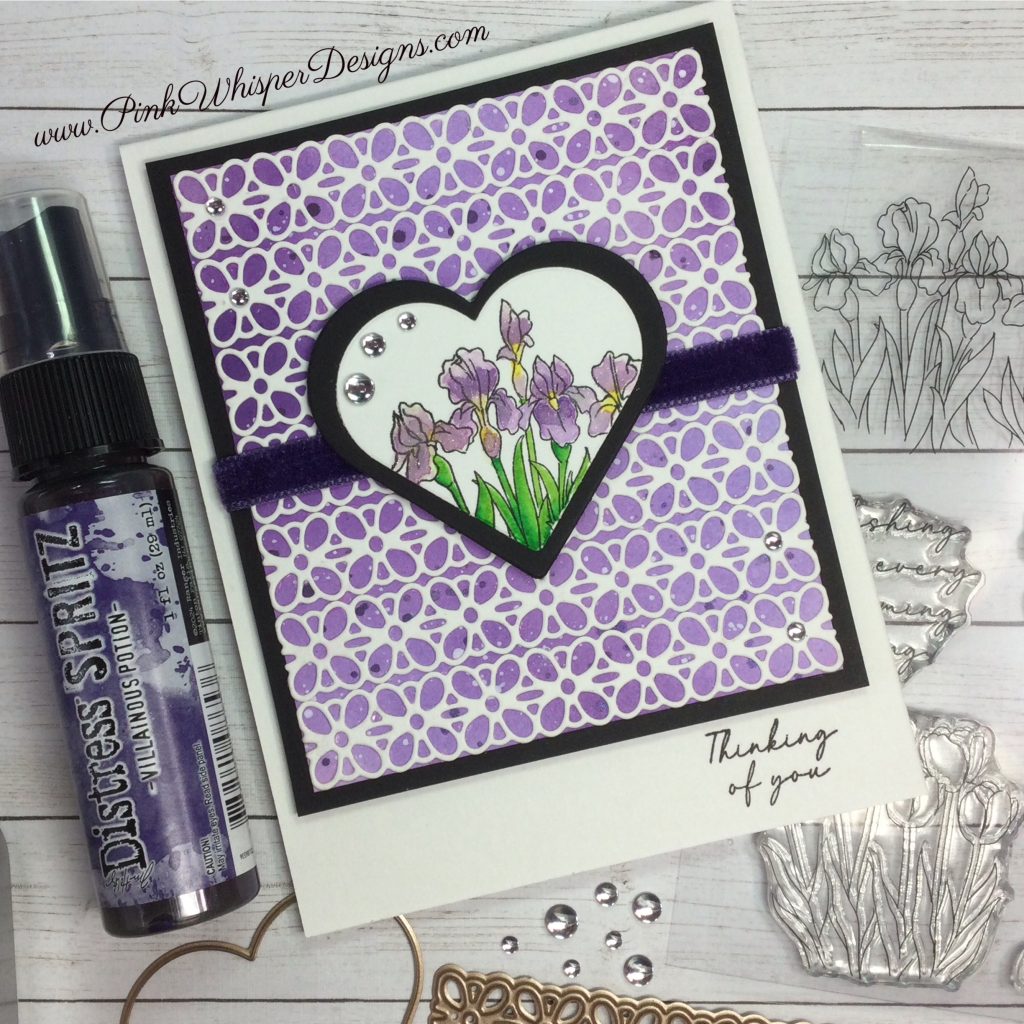
Today we will be using our border/belly band dies to create the look of a full background die-cut panel, thereby, creating a “faux” background die with just one small border die!

Today’s card was inspired by the current Ai “Spritz, Splatter, and Paint” Blog Challenge … and we will be doing a lot of that today!

To begin we will create the colored background for the card by applying some Tim Holtz Distress Inks in Shaded Lilac and Villainous Potion using a blending brush. This will give us some light and dark areas on the panel.

Next, we will add some spatters using the Tim Holtz Distress Spritz in the Villainous Potion as well. This will add some color and shimmer!

Let’s also spatter on some Dr. Ph. Martin’s Bleed Proof White Ink all over the background. This will brighten up the panel and bring in some more of the white which will tie in nicely to our “faux” background die.

To create the “faux” die cut large background you can use any of your border dies or in this case we will use a die from the pretty Ai Decorative Belly Band Dies (5804) Set. You will need to die cut 7 times from some white cardstock.

Once you have all 7 die-cut we can attach them to the colored and spattered panel being sure to line them up nice and straight and butt them up against each other. This will honestly give you the perfect look of a large background die. This is fun because you can create your own patterns and looks with just a simple border die!

Let’s attach this to a piece of black cardstock just slightly larger than this background. That will frame everything nicely. Now we will add some pretty purple velvet ribbon around the center of the panel. Before we pop this up onto the card, we can stamp the “Thinking of You” sentiment in the bottom right-hand corner from that same stamp set.

Now we can die cut two hearts, a larger in black and a smaller one in white, so that we can stamp the flowers onto the smaller white one. For the beautiful irises, we will use the stamp from the Ai Tulip Floral Set (6061) and color the center of the flowers and stems using the Zig Clean Color Real Brush Pens in the following colors: Blender, Yellow, Lt Green, Green. However, to color the flowers we will use the TH Oxide Inks that we used on the background. That way everything will match up perfectly!

Once the coloring is done, we can add some Wink of Stella Glitter to the flowers. Let’s also add a few “ice” gems to the die cut panel for some added interest!

Thank you so much for joining me today! If you enjoyed today’s video, please select the Like and Subscribe buttons and don’t forget to hit that notification bell so that you don’t miss a single video!

All of the supplies used in today’s video are listed below. Click the products below to make a purchase. Where available I use compensated affiliate links which are at no additional costs to you.

Art Impressions Tulip Floral Set (6061)

— https://shrsl.com/4x6fi (artimpressions.com)

— https://shrsl.com/4x6fk (Scrapbook.com)

Art Impressions Decorative Belly Band Dies (5804)

— https://shrsl.com/4x6fl (artimpressions.com)

— https://shrsl.com/4x6fn (Scrapbook.com)

Art Impressions Nested Heart Dies (5721)

— https://shrsl.com/4x6fu (artimpressions.com)

— https://shrsl.com/4x6fy (Scrapbook.com)

#0 Royal Round Detail Brush

— https://shrsl.com/4x6g1 (artimpressions.com)

Wink of Stella Glitter Pen – Clear

— https://shrsl.com/4x6g4 (artimpressions.com)

Dr. Ph. Martin’s Bleed Proof White Ink

— https://shrsl.com/4x6g6 (artimpressions.com)

Zig Clean Color Real Brush Pens

— https://shrsl.com/4x6h0 (dickblick.com)

Tim Holtz Paper Trimmer 8.5″

— https://shrsl.com/4x6g7 (Scrapbook.com)

Tim Holtz Distress Spritz – Villainous Potion

— https://shrsl.com/4x6g8 (Scrapbook.com)

Tim Holtz Distress Oxide Ink Pad – Shaded Lilac

— https://shrsl.com/4x6g9 (Scrapbook.com)

Tim Holtz Distress Oxide Ink Pad – Villainous Potion

— https://shrsl.com/4x6gb (Scrapbook.com)

Tim Holtz Titanium Shears 9.5″

— https://shrsl.com/4x6gd (Scrapbook.com)

Tim Holtz Mini Snips 5″

— https://shrsl.com/4x6ge (Scrapbook.com)

Tim Holtz idea-ology Velvet Trims – Cool

— https://shrsl.com/4x6gg (Scrapbook.com)

Round Acrylic Grid Stamping Block

— https://shrsl.com/4x6gh (Scrapbook.com)

Pinkfresh Studio Brass Triangle Tray

— https://shrsl.com/4x6gi (Scrapbook.com)

Pickfresh Studio Clear Drops – Ice

— https://shrsl.com/4x6gj (Scrapbook.com)

Hero Arts Blending Brush – Large

— https://shrsl.com/4x6gk (Scrapbook.com)

MISTI Mini

— https://shrsl.com/4x6gl (Scrapbook.com)

Dress My Craft Mini Scoreboard

— https://shrsl.com/4x6gm (Scrapbook.com)

LDRS Creative – Stampendable Stamping Tool

— https://shrsl.com/4x6go (Scrapbook.com)

Versafine Onyx Black Ink Pad

— https://shrsl.com/4x6gp (Scrapbook.com)

Nuvo Deluxe Adhesive

— https://shrsl.com/4x6gq (Scrapbook.com)

Tombow Mono Power Mini Glue Tape

— https://shrsl.com/4x6gr (Scrapbook.com)

Ranger Heat it Craft Tool

— https://shrsl.com/4x6gt (Scrapbook.com)

Therm O Web – 3D Adhesive Foam Tape

— https://shrsl.com/4x6gu (Scrapbook.com)

Spellbinders Platinum Scout Die Cutting Machine

— https://shrsl.com/4x6gv (Scrapbook.com)

Cricut Weeding Tool Kit

— https://shrsl.com/4x6gw (dickblick.com)

Strathmore Bristol Smooth 100lb Cardstock

— https://shrsl.com/4x6gy (dickblick.com)

Marvy Jewel Picker

— https://shrsl.com/4x6gz (dickblick.com)


Tim Holtz Mixed Media 37 Stamps and Stencil Set!

Hello and Welcome!!!

Watch video tutorial here!!!

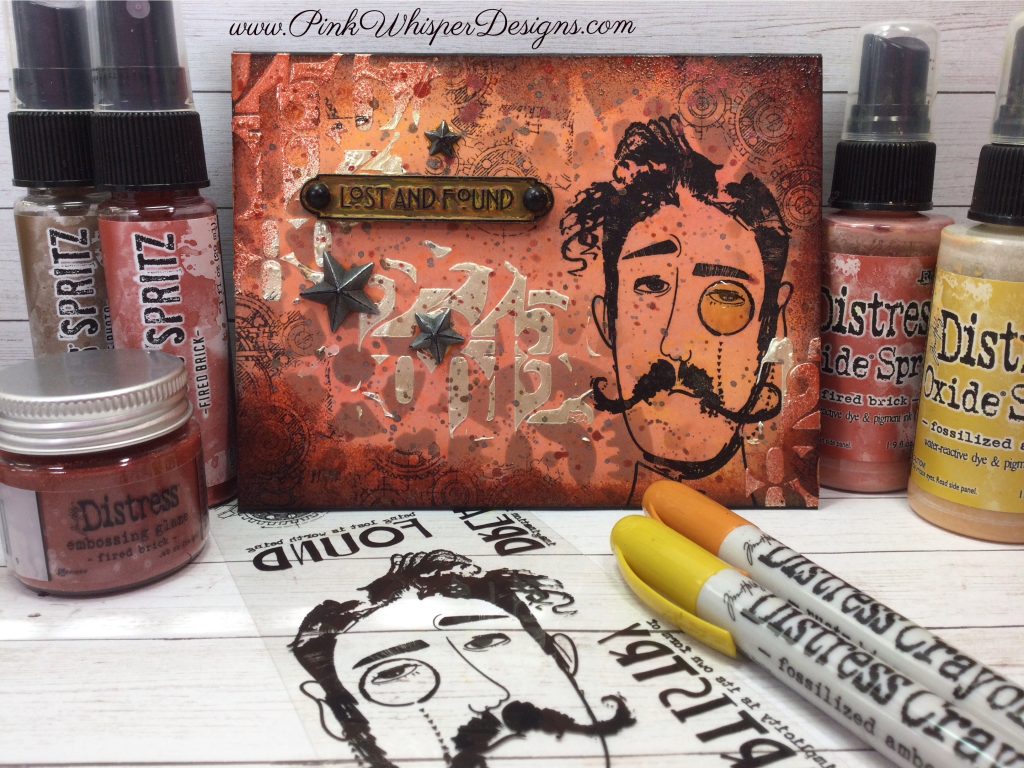
Today we will be using one stamp and stencil set to create this mixed media card! This Tim Holtz Stampers Anonymous – Stamps & Stencil – Mixed Media 37 Set will be all we need to for our stamped and stenciled images.

We will also be using some Distress Sprays, Spritz, and Inks to create a background for the card. We will also do some stenciling with the two-part stencil from this same set. To stencil the gears, we will use some TH Distress Vintage Photo ink and for the numbers portion of the stencil we will use some beautiful Texture Paste in Metallic White. This will add some dimension, shimmer and texture!

We will also stamp the gears around the card panel using the second and third generation stamping as well.

Then we will ink the edges of the panel with the Vintage Photo and Black Soot inks. Let’s set the background panel aside while the texture paste dries completely.

Now we will apply some Versamark Watermark Ink around the edges of the panel so that we can emboss it with some TH Distress Embossing Glase in Fired Brick. You will absolutely love the look of the glaze… it adds shine and color while still allowing the images and colors to show through. I’ll show you exactly what I mean in today’s video.

We will add an idea-ology word plaque that says, “Lost and Found” and apply some color to it using the TH Distress Crayons in Fossilized Amber and Fired Brick. Once the crayons have been applied, we will ink the plaque with some black ink to make the letters and frame stand out more prominently. Also, we will add some black droplets to the holes on the plaque.

Let’s add some metal stars and ink the high spots on these as well for added interest. We will also add some clear glaze to the monocle to give it a more realistic look! Once the glaze dries it will be crystal clear!

Finally, we will add a panel to the inside of our standard A2 size black card base. For this panel we will use one of the many wonderful sentiments also included in this stamp and stencil set and it says, “Being Lost is Worth Being Found”. This goes perfectly with the word plaque on the front of the card!

Thank you so much for joining me today! If you enjoyed today’s video, please select the Like and Subscribe buttons and don’t forget to hit that notification bell so that you don’t miss a single video!

All of the supplies used in today’s video are listed below. Click the products below to make a purchase. Where available I use compensated affiliate links which are at no additional costs to you.

Tim Holtz Stampers Anonymous – Stamps & Stencil – Mixed Media 37

— https://shrsl.com/4×524 (Scrapbook.com)

Tim Holtz idea-ology – Word Plaques

— https://shrsl.com/4×526 (Scrapbook.com)

Tim Holtz idea-ology – Adornments, Stars or Adornments, Lucky

— https://shrsl.com/4×529 (Scrapbook.com)

Tim Holtz idea-ology – Droplets Halloween or Buttons Galore & More – Half Pearlz – Wicked Fun

— https://shrsl.com/4x52a (Scrapbook.com)

Tim Holtz Distress Palette Knives

— https://shrsl.com/4x52b (Scrapbook.com)

Tim Holtz Mixed Media Heavystock

— https://shrsl.com/4x52c (Scrapbook.com)

Tim Holtz Distress Spritz – Fired Brick

— https://shrsl.com/4x52e (Scrapbook.com)

Tim Holtz Distress Spritz – Vintage Photo

— https://shrsl.com/4x52f (Scrapbook.com)

Ranger Ink – Tim Holtz – Distress Crayons – Set 2 (includes Rusty Hinge, Fossilized Amber)

— https://shrsl.com/4x52i (Scrapbook.com)

Tim Holtz Distress Oxide Spray – Fired Brick

— https://shrsl.com/4x52k (Scrapbook.com)

Tim Holtz Distress Oxide Spray – Fossilized Amber

— https://shrsl.com/4x52m (Scrapbook.com)

Tim Holtz Distress Oxide Ink Pad – Vintage Photo

— https://shrsl.com/4x52o (Scrapbook.com)

Tim Holtz Distress Oxide Ink Pad – Black Soot

— https://shrsl.com/4x52p (Scrapbook.com)

Tim Holtz Distress Embossing Glaze – Fired Brick

— https://shrsl.com/4x52r (Scrapbook.com)

Tim Holtz Paper Trimmer 8.5 Inch

— https://shrsl.com/4x52t (Scrapbook.com)

Tim Holtz Distress Sprayer

— https://shrsl.com/4x52v (Scrapbook.com)

Tim Holtz Foam Applicator Tools

— https://shrsl.com/4x52w (Scrapbook.com)

Ranger Archival Ink Pad – Jet Black

— https://shrsl.com/4x52x (Scrapbook.com)

Ranger Multi Medium Matte

— https://shrsl.com/4×531 (Scrapbook.com)

Ranger Texture Paste – Metallic White

— https://shrsl.com/4×533 (Scrapbook.com)

Ranger Non-Stick Craft Sheet 15″ x 18″

— https://shrsl.com/4×536 (Scrapbook.com)

Ranger Heat it Craft Tool

— https://shrsl.com/4×537 (Scrapbook.com)

LDRS Creative – Stampendable Stamping Tool

— https://shrsl.com/4×539 (Scrapbook.com)

Versafine Onyx Black Ink Pad

— https://shrsl.com/4x53a (Scrapbook.com)

Versamark Watermark Ink Pad

— https://shrsl.com/4x53c (Scrapbook.com)

Nuvo Deluxe Adhesive

— https://shrsl.com/4x53e (Scrapbook.com)

Judikins Diamond Glaze

— https://shrsl.com/4x53g (Scrapbook.com)

MISTI Mini

— https://shrsl.com/4x53i (Scrapbook.com)

Dress My Craft Mini Scoreboard

— https://shrsl.com/4x53l (Scrapbook.com)

Scrapbook.com 3D Foam Squares – Sm

— https://shrsl.com/4x53o (Scrapbook.com)

Tombow – Mono Power Mini Glue Tape

— https://shrsl.com/4x53r (Scrapbook.com)


Combining Stamp Sets – Create a Cute Porch Scene!

Hello and Welcome!!!

Watch video tutorial here!!!

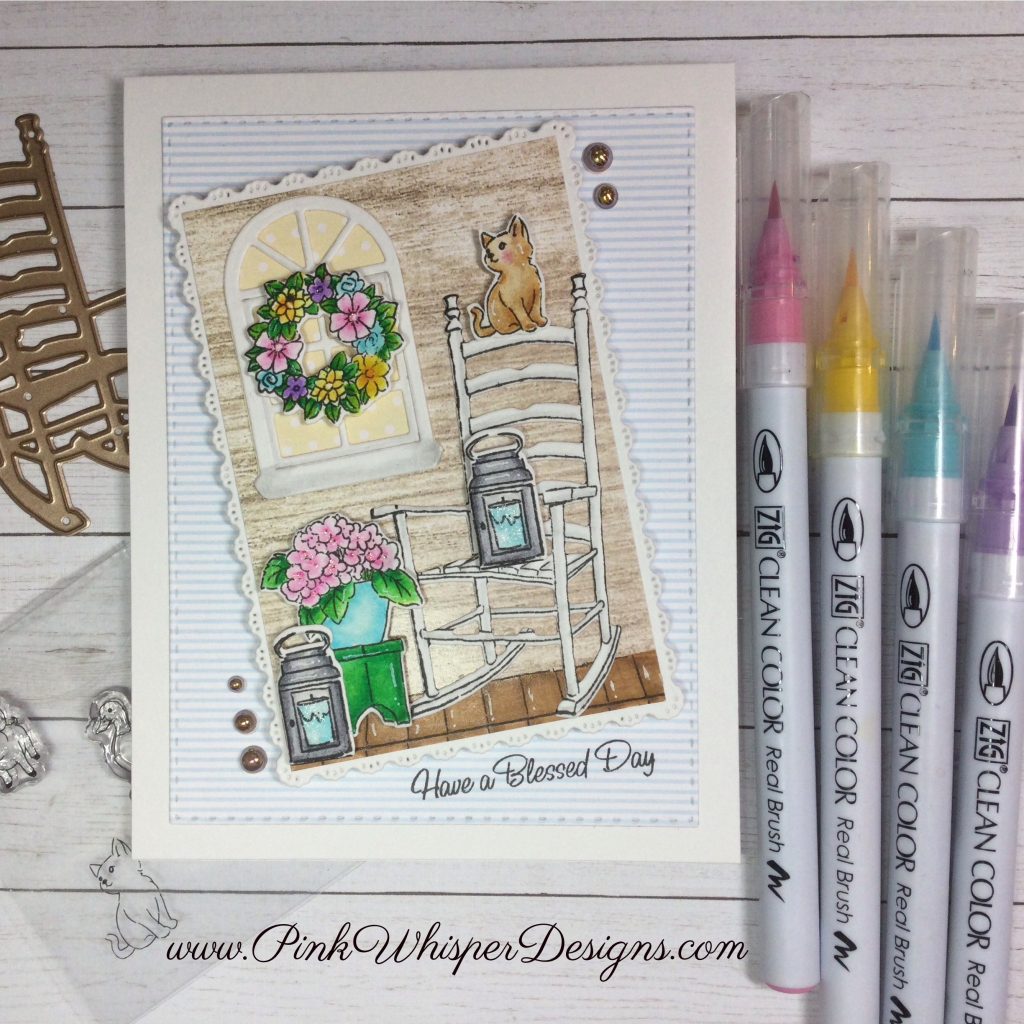
Today I thought it would be fun to grab a bunch of stamp sets (mostly from the Front Porch Series) to create a sweet little front porch scene! This is a fun way to use your stamps in a fun, new and unique way!

Let’s get started by stamping and coloring all of our images from several different sets including Ai Front Porch Set (5512), Ai Front Porch Garden Set (5486), Ai Front Porch Farmhouse Set (5490), Ai WC Rocking Chair Set (5360), and the Ai Dwelling Animal Set (5991). All of the coloring was done using the Zig Clean Color Real Brush Pens in the following colors: Blender, Lemon Yellow, Yellow, Bright Yellow, Sugared Almond Pink, Peach Pink, Lilac, Violet, Lt Gray, Gray, May Green, Green, Beige, Mustard, Ice Blue, Lt Blue. Now we can die-cut the images using the coordinating dies and for the little kitten we will cut that out using our detail scissors.

We will also die-cut a pretty arched window using the Ai Mini Journal Template Set (5718) and place some yellow and white polka dot paper inside the window using the Ai Easter Bunny Paper Pack (6036). We will also use this same paper pack to die-cut the blue and white striped paper for the background. Let’s go ahead and create the A2 size white card base and attach the striped paper.

Now let’s also die-cut the pretty scallop rectangle for our scene using the Ai Decorative Belly Bands Set (5804). We will cut a piece of woodgrain paper for the inside of the rectangle using the Ai Winter Woodland Paper Pack (5963).

Let’s stamp the front porch tiles only onto this woodgrain paper using the Post-it Labeling and Cover-up Tape to mask off the top part of the stamp. We can quickly color the porch!

Now we will start adding all of the items to the porch by gluing some flat and popping up some of the others. We will also pop up this porch scene onto the front of the card…but first we need to stamp the sentiment on a little bit of an angle. This sentiment will say “Have a Blessed Day” and will be perfect for this card!

Once everything is attached, we will add a few pretty champagne-colored gems for a bit of sparkle and elegance!

Thank you so much for joining me today! If you enjoyed today’s video, please select the Like and Subscribe buttons and don’t forget to hit that notification bell so that you don’t miss a single video!

All of the supplies used in today’s video are listed below. Click the products below to make a purchase. Where available I use compensated affiliate links which are at no additional costs to you.

Art Impressions WC Rocking Chair Set (5360)

— https://shrsl.com/4x1ux (artimpressions.com)

— https://shrsl.com/4x1uz (Scrapbook.com)

Art Impressions Dwelling Animal Set (5991)

— https://shrsl.com/4x1v0 (artimpressions.com)

Art Impressions Front Porch Set (5512)

— https://shrsl.com/4x1v1 (artimpressions.com)

— https://shrsl.com/4x1v3 (Scrapbook.com)

Art Impressions Front Porch Garden Set (5486)

— https://shrsl.com/4x1v5 (artimpressions.com)

Art Impressions Front Porch Farmhouse Set (5490)

— https://shrsl.com/4x1va (artimpressions.com)

Art Impressions Decorative Belly Bands (5804)

— https://shrsl.com/4x1vj (artimpressions.com)

— https://shrsl.com/4x1vn (Scrapbook.com)

Art Impressions Mini Journal Template (5718)

— https://shrsl.com/4x1vu (artimpressions.com)

— https://shrsl.com/4x1vw (Scrapbook.com)

Art Impressions Rectangle A2 Double Stitched Dies (5063)

— https://shrsl.com/4x1vy (artimpressions.com)

— https://shrsl.com/4x1vz (Scrapbook.com)

Art Impressions Easter Bunny PP (6036)

— https://shrsl.com/4x1w1 (artimpressions.com)

— https://shrsl.com/4x1w3 (Scrapbook.com)

Art Impressions Winter Woodland PP (5963)

— https://shrsl.com/4x1w4 (artimpressions.com)

— https://shrsl.com/4x1w6 (Scrapbook.com)

Wink of Stella Glitter Pen – Clear

— https://shrsl.com/4x1wb (artimpressions.com)

Post-it Labeling and Cover-up Tape

— https://shrsl.com/4x1wc (artimpressions.com)

Zig Clean Color Real Brush Pens

— https://shrsl.com/4x1x3 (dickblick.com)

Pinkfresh Studio Brass Triangle Tray

— https://shrsl.com/4x1we (Scrapbook.com)

Pinkfresh Studio Metallic Pearls – Sparkling Champagne

— https://shrsl.com/4x1wg (Scrapbook.com)

Dress My Craft – Mini Scoreboard

— https://shrsl.com/4x1wi (Scrapbook.com)

MISTI Mini

— https://shrsl.com/4x1wk (Scrapbook.com)

Sakura Gelly Roll Pen – White

— https://shrsl.com/4x1wl (Scrapbook.com)

Scrapbook.com 3D Foam Squares – Sm & Lg

— https://shrsl.com/4x1wm (Scrapbook.com)

Nuvo Deluxe Adhesive

— https://shrsl.com/4x1wn (Scrapbook.com)

LDRS Creative – Stampendable Stamping Tool

— https://shrsl.com/4x1wo (Scrapbook.com)

Versafine Onyx Black Ink Pad

— https://shrsl.com/4x1wp (Scrapbook.com)

Tim Holtz – 8.5″ Guillotine Comfort Trimmer

— https://shrsl.com/4x1wr (Scrapbook.com)

Spellbinders Platinum Scout Die Cutting Machine

— https://shrsl.com/4x1wu (Scrapbook.com)

We R Makers Detail Scissors

— https://shrsl.com/4x1wv (Scrapbook.com)

Marvy Jewel Picker

— https://shrsl.com/4x1x1 (dickblick.com)

Cricut Weeding Tool Kit

— https://shrsl.com/4x1wy (dickblick.com)

Strathmore Bristol Smooth 100lb Cardstock

— https://shrsl.com/4x1ww (dickblick.com)