Category: Gatefold Card

Scalloped Tri-fold “Princess” Card!

Hello and Welcome!

Watch video tutorial here!

I’m excited to be the featured artist for the brand-new Ai “Architecture” Blog Challenge which is to include anything architectural in your card or project. This can include houses, barns, cottages, or even a castle like we will be using today!

To make this trifold card design really easy we will be using the Ai Tryfolds Cards and Envelopes Pack and add a pretty scalloped border to each flap on the card using the Scrapbook.com Variety Edges Dies. There are several edge dies to choose from in this set…so pick the one you like best!

We will also add some beautiful, patterned papers to the two front flaps and the inside panel of the card. To do this we will be using the Ai Floral Shop PP 6205). I’ll show you in today’s video how to easily line these up to create the double scalloped edge on your card. The double-sided paper packs are perfect for mixing and matching the layers on your cards.

Next, we can stamp the cute little castle using the Ai Woodland Castle Set (5916) and quickly color it in using the Zig Clean Color Real Brush Pens in the following colors: Blender, Lt Pink, Pink, Sage Green, Aquamarine Blue, Gray Tint, Lt Beige, Beige. Now, using our detail scissors, we can fussy cut the castle.

Let’s also stamp our sweet “Princess” sentiments on the second flap and the inside panel of the card.

Now we can add our patterned papers, but before we add the focal image, we will add some Dusty Rose twine around the card for a pretty closure. To do this we will cut another panel from some white cardstock and sandwich the twine between these two layers. This will also thicken up the card a bit more and keep the twine from falling off when the card is opened by the recipient.

For the castle we will die cut two scalloped circles from the Ai Scalloped Circles Die Set (6045). This will coordinate nicely with the scallops on the flaps. Add your castle image and pop it up with some 3D Foam Squares.

Finally, let’s add some pretty sequins and tie a bow!

Thank you so much for joining me today! If you enjoyed today’s video, please select the Like and Subscribe buttons and don’t forget to hit that notification bell so that you don’t miss a single video!

All of the supplies used in today’s video are listed below. Click the products below to make a purchase. Where available I use compensated affiliate links which are at no additional costs to you.

Art Impressions Woodland Castle Set (5916)

—- https://tidd.ly/4eqKtEC (artimpressions.com)

Art Impressions Scalloped Circle Dies (6045)

— https://tidd.ly/3IHBfbm (artimpressions.com)

— https://tidd.ly/4xxsntn (Scrapbook.com)

Art Impressions Floral Shop PP (6205)

— https://tidd.ly/3PcRaBC (artimpressions.com)

— https://tidd.ly/4uojznq (Scrapbook.com)

Art Impressions Tryfolds Cards and Envelopes (4437)

— https://tidd.ly/43DGW0L (artimpressions.com)

WInk of Stella Clear Glitter Pen

— https://tidd.ly/4fPmRtA (artimpressions.com)

Post-it Labeleing Tape

— https://tidd.ly/3HMQnno (artimpressions.com)

Scrapbook.com – Variety Edges Dies

— https://tidd.ly/4ecbBbK (Scrapbook.com)

Scrapbook.com 1/4” Double Sided Tape

— https://tidd.ly/3OfiPS6 (Scrapbook.com)

Scrapbook.com 3D Foam Squares – Lg 2mm

— https://tidd.ly/4nFAYVt (Scrapbook.com)

Zig Clean Color Real Brush Pens

— https://tidd.ly/4lJhzBh (dickblick.com)

Lawn Fawn Twine – Dusty Rose

— https://tidd.ly/4aXLgwA (Scrapbook.com)

Pinkfresh Studio Brass Triangle Tray

— https://tidd.ly/4n4LnK8 (Scrapbook.com)

Pink & Main – Prom Dress Confetti

— https://tidd.ly/48Xjb68 (Scrapbook.com)

Tim Holtz Titanium Shears 9.5”

— https://tidd.ly/4vb4pCG (Scrapbook.com)

Tim Holtz Paper Trimmer 8.5”

— https://tidd.ly/3JQnN50 (Scrapbook.com)

Spellbinders Platinum 6 Die Cutting Machine

— https://tidd.ly/48oYfX0 (Scrapbook.com)

Spellbinders Platinum Scout Die Cutting Machine

— https://tidd.ly/3W1pHTg (Scrapbook.com)

Pinkfresh Studio – Dual Tip Embellishment Tool

— https://tidd.ly/4iwsVsf (Scrapbook.com)

Cricut Weeding Tool Kit

— https://tidd.ly/464NHdX (dickblick.com)

We R Makers Detail Scissors

—https://tidd.ly/4mH1xJt (Scrapbook.com)

Versafine Ink Pad – Onyx Black

— https://tidd.ly/4lNt4HR (Scrapbook.com)

Nuvo Deluxe Adhesive

— https://tidd.ly/4lEYsIv (Scrapbook.com)

Scrapbook.com Reverse Tweezers

— https://tidd.ly/4n2MDgX (Scrapbook.com)

MISTI Original

—https://tidd.ly/4aOF2hG (Scrapbook.com)

MISTI Mini

— https://tidd.ly/4pFz0Fd (Scrapbook.com)

Strathmore Bristol Smooth 100lb Cardstock

— https://tidd.ly/45AGEJS (dickblick.com)


Using Double-Sided Pattern Papers to Create a Gatefold Card!

Hello and Welcome!!!

Watch video tutorial here!!!

Let’s use our double-sided pattern papers today to create a fun, whimsical, and colorful gatefold card! By using the Ai Easter Bunny Paper Pack (6036) we will have all of the coordinating papers to create a gatefold card that will have pretty patterns on both the inside and outside of the card.

This card was inspired by the current Ai “Un-Bear-ably Cute!” Blog Challenge which is to create any card or project using a bear! So, I thought we would use the cute Ai Valentine Bears Set (5005) and we will be using the little bear with the string of hearts for our focal image today! We will also use some bees from the Ai Honey Bee Set (5925).

Let’s stamp and color the bear and bees using the Zig Clean Color Real Brush Pens in the following colors: Blender, Pink Haze, Lt Pink, Pale Yellow, Yellow, Haze Blue, Flesh Colour, Beige, Mid Brown, Warm Gray 6.

Next, we will create the frames, flaps, and panels for this fun gatefold card … and I will show you how to create all of these pieces and give you all of the measurements in today’s video. The hardest part is selecting the pattern papers that you will want to use for each of the sections of the card. We will be using the Ai Portfolio Template Die Set for the scallop frame and to create the two flaps on the front of the card. I’ll show you a little trick for hiding the tabs on the front flaps and I’ll also show you a trick for lining up the frame on the inside of the card perfectly with the one on the front of the card!

We will stamp a few cute sentiments using the Ai Panda Set (5821) which will say “bear hugs” and “I like you beary much”!

Let’s assemble the card and add our cute little bees for a bit more interest and whimsy! We can also add some clear glitter pen to the wings of the butterflies and the string of hearts.

As a finishing touch, let’s add some sparkly gems in gold dust to the front of the card!

Thank you so much for joining me today! If you enjoyed today’s video, please select the Like and Subscribe buttons and don’t forget to hit that notification bell so that you don’t miss a single video!

All of the supplies used in today’s video are listed below. Click the products below to make a purchase. Where available I use compensated affiliate links which are at no additional costs to you.

Art Impressions Valentine Bears Set (5005)

— https://shrsl.com/4vxwk (artimpressions.com)

Art Impressions Panda Set (5821)

— https://shrsl.com/4vxwo (artimpressions.com)

Art Impressions Honey Bee Set (5925)

— https://shrsl.com/4vxwp (artimpressions.com)

— https://shrsl.com/4vxwq (Scrapbook.com)

Art Impressions Portfolio Template Die Set (5952)

— https://shrsl.com/4vxws (artimpressions.com)

— https://shrsl.com/4vxwt (Scrapbook.com)

Art Impressions Easter Bunny Paper Pack (6036)

— https://shrsl.com/4vxxd (artimpressions.com)

— https://shrsl.com/4vxxe (Scrapbook.com)

Steel Die Cutters (5765)

— https://shrsl.com/4vxwv (artimpressions.com)

Wink of Stella Glitter Pen – Clear

— https://shrsl.com/4vxww (artimpressions.com)

Zig Clean Color Real Brush Pens

— https://shrsl.com/4vxwy (dickblick.com)

Pinkfresh Studio Gems – Clear w/ Gold Dust or Ombre Glitter Drops – Sparkle and Shine

— https://shrsl.com/4vxxf (Scrapbook.com)

Pinkfresh Studio Brass Triangle Tray

— https://shrsl.com/4vxxg (Scrapbook.com)

Scrapbook.com 3D Foam Squares – Sm

— https://shrsl.com/4vxxh (Scrapbook.com)

Scrapbook.com 1/4″ Double-sided Tape

— https://shrsl.com/4vxxj (Scrapbook.com)

Pink and Main – Pick Up and Place Tool

— https://shrsl.com/4vxxm (Scrapbook.com)

Strathmore Bristol Smooth 100lb Cardstock

— https://shrsl.com/4vxwz (dickblick.com)

Cricut Weeding Tool Kit

— https://shrsl.com/4vxx0 (dickblick.com)

Sakura Gelly Roll Pen – White

— https://shrsl.com/4vxx1 (dickblick.com)

Nuvo Deluxe Adhesive

— https://shrsl.com/4vxx4 (Scrapbook.com)

LDRS Creative – Stampendable Stamping Tool – Rose Quartz

— https://shrsl.com/4vxx6 (Scrapbook.com)

Versafine Ink Pad – Onyx Black

— https://shrsl.com/4vxx7 (Scrapbook.com)

We R Makers Detail Scissors

— https://shrsl.com/4vxx9 (Scrapbook.com)

MISTI Mini

— https://shrsl.com/4vxxn (Scrapbook.com)

Tonic Studios – Tim Holtz – 8.5 Inch Guillotine Comfort Trimmer

— https://shrsl.com/4vxxp (Scrapbook.com)

Spellbinders Platinum Scout Die Cutting Machine

— https://shrsl.com/4vxxr (Scrapbook.com)


Double Flap Gatefold Birthday Card!

Hello and Welcome!!!

Watch video tutorial here!!!

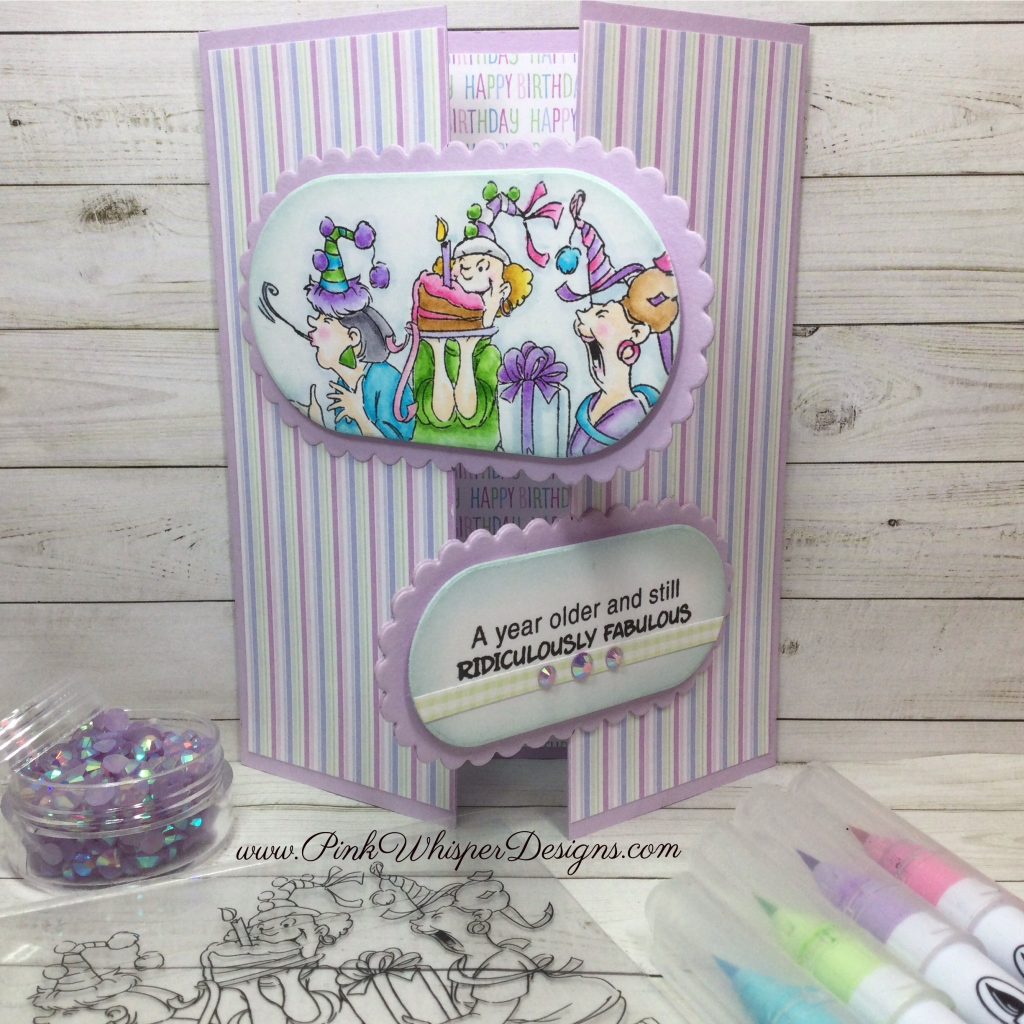
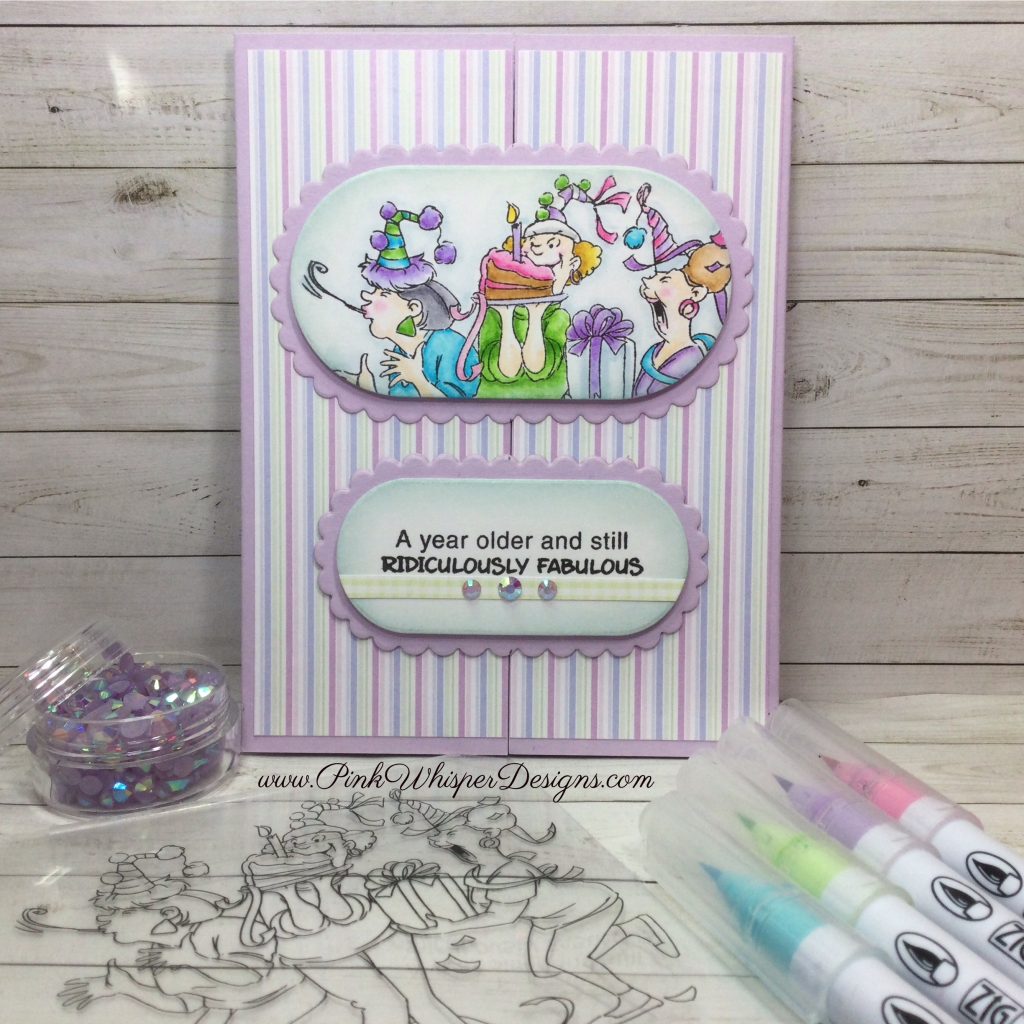
Today we will be creating a “Double Flap Gatefold” card! When you open the card, one of the flaps will go to the left and the other goes to the right! It’s a unique variation on a gatefold card that is lots of fun!

For our focal image we will be using the Ai Practically Perfect Set (5280). These adorable ladies are really going all out for this birthday celebration with cake, gifts, party hats and lots of confetti! There are also three perfectly coordinated sentiments included in this set.

We will first die cut the scallop ovals out of some lavender cardstock and the plain ovals from some white 100lb cardstock. These dies are from the Ai Journal Oval Frames (5588) Set.

Let’s start by stamping these ladies onto the largest white oval and the sentiment onto the smaller white oval. Now we can do some coloring using the Zig Clean Color Real Brush Pens in the following colors: Blender, Sugared Almond Pink, Peach Pink, Flesh Colour, Yellow, Pale Violet, Lilac, Pale Green, Lt Green, Lt Blue, Cobalt Blue, Haze Blue, Lt Gray, Beige, Gray.

Let’s assemble the ovals and add a strip of green plaid paper underneath the sentiment for a bit more interest. We will also add some pretty lavender gems to this strip of paper for some sparkle!

Now we can create the gatefold card base using the lavender cardstock and we will add some patterned paper panels from the Mini Birthday Paper Pack (5873) to the inside of the card and onto the flaps on the front of the card. I will show you exactly how to create this gatefold and give you all of the measurements in today’s video!

We will also add a scallop border to the left and right side of the inside of the card using the Ai Journal Template Set (5543). This will coordinate nicely with the scallop ovals on the front of the card.

Finally, we can glue the ovals to the two front flaps of the card. We will glue half of the oval with the ladies to the left panel and half of the oval with the sentiment to the right panel. This cute sentiment will say “A year older and still RIDICULOUSLY FABULOUS”!

This birthday card will bring a smile to anyone’s face, and it is so easy to create!

Thank you so much for joining me today! If you enjoyed today’s video, please select the Like and Subscribe buttons and don’t forget to hit that notification bell so that you don’t miss a single video!

All of the supplies used in today’s video are listed below. Click the products below to make a purchase. Where available I use compensated affiliate links which are at no additional costs to you.

Art Impressions Practically Perfect Set (5280)

— https://shrsl.com/4f6v0 (artimpressions.com)

— https://shrsl.com/4f6v1 (Scrapbook.com)

Art Impressions Journal Oval Frames (5588)

— https://shrsl.com/4f6v4 (artimpressions.com)

— https://shrsl.com/4f6v7 (Scrapbook.com)

Art Impressions Journal Template Set (5543)

— https://shrsl.com/4f6v9 (artimpressions.com)

— https://shrsl.com/4f6vb (Scrapbook.com)

Art Impressions Mini Birthday Paper Pack (5873)

— https://shrsl.com/4f6ve (artimpressions.com)

Post-it Labeling and Cover-up Tape

— https://shrsl.com/4f6vg (artimpressions.com)

Zig Clean Color Real Brush Pens

— https://shrsl.com/4f6w3 (dickblick.com)

Hero Arts Hero Hues Cardstock – Lavender 100lb

Tim Holtz Distress Oxide Ink Pad – Speckled Egg

— https://shrsl.com/4f6vi (Scrapbook.com)

Tim Holtz – Distress Tiny Blending Tool – Domed

— https://shrsl.com/4f6vk (Scrapbook.com)

Tim Holtz – Distress Tiny Blending Tool Replacement Foams – Domed

— https://shrsl.com/4f6vn (Scrapbook.com)

Tim Holtz – 8.5 Inch Comfort Trimmer

— https://shrsl.com/4f6vo (Scrapbook.com)

Pinkfresh Studio – Essentials Collection – Dual Tip Embellishment Tool

— https://shrsl.com/4f6vq (Scrapbook.com)

Pinkfresh Studio – Essentials Collection – Jewel Refill Pack – Lavender

— https://shrsl.com/4f6vr (Scrapbook.com)

Versafine Onyx Black Ink Pad

— https://shrsl.com/4f6vt (Scrapbook.com)

Sizzix Sidekick Die Cutting Machine

— https://shrsl.com/4f6vu (Scrapbook.com)

Dress My Craft Mini Scoreboard

— https://shrsl.com/4f6vv (Scrapbook.com)

MISTI Original

— https://shrsl.com/4f6vw (Scrapbook.com)

Scrapbook.com Adhesive Foam Squares – Small and Large

— https://shrsl.com/4f6vx (Scrapbook.com)

Nuvo Deluxe Adhesive

— https://shrsl.com/4f6vy (Scrapbook.com)

STAMPendable

— https://shrsl.com/4f6vz (Scrapbook.com)

Strathmore Bristol Smooth 100lb Cardstock

— https://shrsl.com/4f6w0 (dickblick.com)

Cricut Weeding Tool Kit

— https://shrsl.com/4f6w2 (dickblick.com)


Hero Arts Interlocking Gatefold Card w/ Diamond Dies and Layering Stencils!

Hello and Welcome!!!

Watch video tutorial here!!!

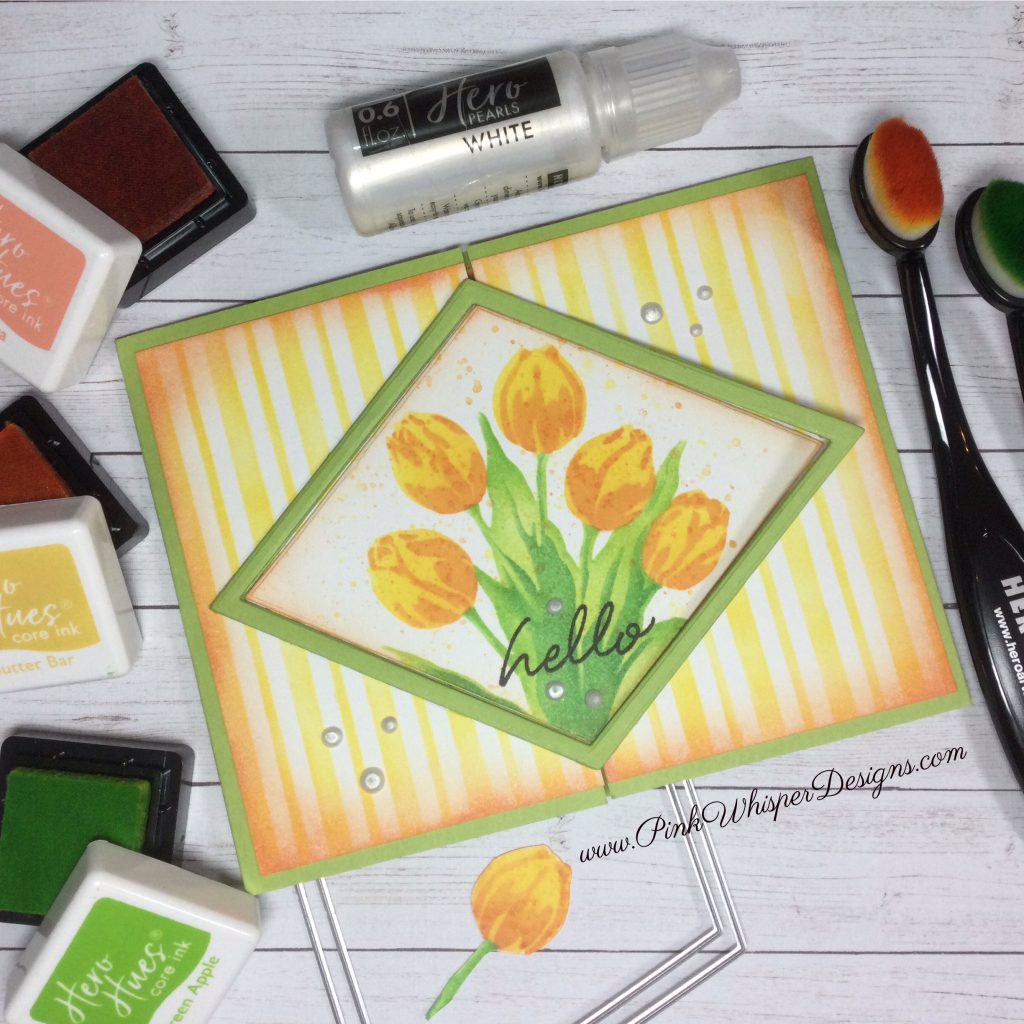
Let’s create an elegant Interlocking Gatefold card today using lots and lots of products from Hero Arts!

To get started, we can take the beautiful Hero Arts Color Layering Stencils – Tulip Bouquet Set. This set contains 4 layers of stencils so that we can easily do the coloring and shading with our blending brushes and ink pads!

Let’s grab a piece of Strathmore Bristol Smooth Cardstock to do our blending. We will be using the Hero Arts Small Blending Brushes for this stenciling process and the ink colors today will be using the Hero Arts Core Inks in Green Apple, Fresh Lawn, Pine, Dandelion, Butter Bar and Papaya. These colors will blend together beautifully! We can also quickly spatter these flowers with these same inks!

Now we can begin creating the interlocking mechanism for the front of the card. To do this we will use the fantastic Hero Arts – Infinity Diamond Dies. We will create a frame with these dies by using the largest die and the next smaller die and cut these out 3 times. By gluing the 3 diamonds together we will have a nice solid frame for the interlocking feature! We can also cut the tulips from the smaller diamond die, and this will fit perfectly inside the frame!

Next, we can get started building the card base for our gatefold card and cutting the layers for the card. I’ll show you all of the measurements for cutting and scoring in today’s video!

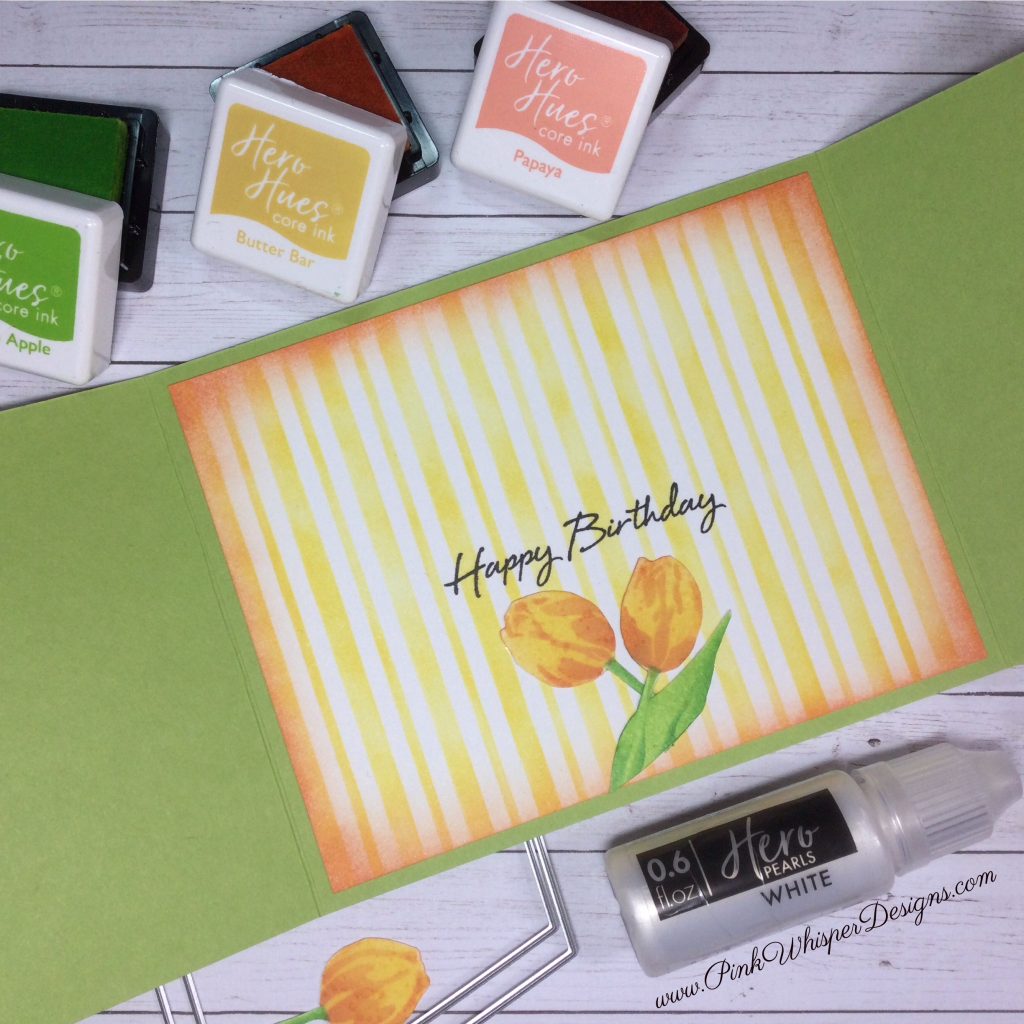
Now that we have our layering papers cut, we can start the stenciling on these layers. We will be using the Hero Arts – Stencil Square – Stripe! This is a stencil that can be used in a variety of ways but today we will do some simple stenciling using the Dandelion ink and then add ink around the edges with the Papaya ink.

Let’s glue the layers to the inside of the card base and front panels.

Now for the fun part…. let’s add the tulips on the card by gluing only the right-hand side of the diamond and gluing it to the right panel on the card. Next, we can place glue on only the left-hand side of the diamond frame and glue it to the left panel of the card. Be sure to line this up really well with the tulips that you have already glued down.

We can now stamp a few sentiments by using the Hero Arts – Togetherness Flower Bouquet Stamp Set. This set has some absolutely beautiful sentiments and script for all of your cards! y and add an elegant touch to the card!

Thank you so much for joining me today! If you enjoyed today’s video, please select the Like and Subscribe buttons and don’t forget to hit that notification bell so that you don’t miss a single video!

All of the supplies used in today’s video are listed below. Click the products below to make a purchase. Where available I use compensated affiliate links which are at no additional costs to you.

Hero Arts – Color Layering Stencils – Tulip Bouquet (Stencil Set)

— https://shrsl.com/4er1t (heroarts.com)

Hero Arts – Tulip Bouquet Bundle (Stamp and Die Set)

— https://shrsl.com/4er1q (heroarts.com)

Hero Arts – Tulip Bouquet (Stamp Set)

— https://shrsl.com/4er1p (heroarts.com)

— https://shrsl.com/4er1z (Scrapbook.com)

Hero Arts – Stencil Square – Stripe

— https://shrsl.com/4er2b (heroarts.com)

— https://shrsl.com/4er25 (Scrapbook.com)

Hero Arts – Infinity Dies – Diamond

— https://shrsl.com/4er2i (heroarts.com)

— https://shrsl.com/4er2f (Scrapbook.com)

Hero Arts – Togetherness Flower Bouquet (Stamp Set)

— https://shrsl.com/4er2l (heroarts.com)

Hero Arts – Hero Hues – Ink Cubes Pack – Core – Fresh Greens (Kiwi, Green Apple, Fresh Lawn, Pine)

— https://shrsl.com/4er4l (heroarts.com)

— https://shrsl.com/4er46 (Scrapbook.com)

Hero Arts – Hero Hues – Ink Cubes Pack – Core (Dandelion, Butter Bar, Papaya, and Pumpkin)

— https://shrsl.com/4er4g (heroarts.com)

— https://shrsl.com/4er4q (Scrapbook.com)

Hero Arts – Hero Hues Premium Cardstock 100lb – Kiwi

— https://shrsl.com/4er2r (heroarts.com)

Hero Arts – Blending Brush – Small

— https://shrsl.com/4er2u (heroarts.com)

— https://shrsl.com/4er2t (Scrapbook.com)

Hero Arts – Hero Pearls – White

— https://shrsl.com/4er2z (heroarts.com)

— https://shrsl.com/4er2x (Scrapbook.com)

Versafine Onyx Black Ink Pad

— https://shrsl.com/4er33 (Scrapbook.com)

Spellbinders Platinum 6 Die Cutting Machine

— https://shrsl.com/4er34 (Scrapbook.com)

Wendy Vecchi Make-art Stay-tion 12″

— https://shrsl.com/4er35 (Scrapbook.com)

Nuvo Deluxe Adhesive

— https://shrsl.com/4er38 (Scrapbook.com)

Dress My Craft Mini Scoreboard

— https://shrsl.com/4er39 (Scrapbook.com)

MISTI Mini

— https://shrsl.com/4er3d (Scrapbook.com)

Tim Holtz Distress Sprayer

— https://shrsl.com/4er3e (Scrapbook.com)

Tim Holtz 8.5 Inch Comfort Trimmer

— https://shrsl.com/4er3i (Scrapbook.com)

Post-it Labeling and Cover-up Tape

— https://shrsl.com/4er3q (artimpressions.com)

Tombow Mono Dotted Tape Runner

— https://shrsl.com/4er3l (dickblick.com)

Strathmore Bristol Smooth 100lb Cardstock

— https://shrsl.com/4er3o (dickblick.com)


Spellbinders Autumn Leaf Border w/ Glimmer Hot Foiling

Hello and Welcome!

Today we are going to have some fun with the Spellbinders Glimmer Hot Foil System! We will be creating a gatefold birthday card with a pretty velvet belly band. And to add some additional interest, we will add a Tim Holtz metal “word band”.

I’ll show you how we will use the Metallic Gilding Polish to add color to the metal “word band”. Then we will highlight the lettering by using a Distress Crayon!

We will be using the Spellbinders Autumn Leaf Border Glimmer Plate! I’ll show you how quick and easy it is to apply this beautiful foiling to your projects! We will also use the Spellbinders Cannetille Rectangle Die to give this card a unique border and angled edge….which is so elegant!

After we have done the foiling, we will then apply some subtle color to the leaves using the Tim Holtz Distress Oxide Ink Pads in a variety of Fall colors. These work great on colored cardstock!

I know that a lot of us have a hard time creating masculine cards and sympathy cards…and this style would be great for either of those occasions!

Thank you so much for joining me today! If you enjoyed todays video please click on the Like button and Subscribe…and don’t forget to hit that notification bell so that you don’t miss a single video!

All of the supplies used in todays video are listed below. Click the products below to make a purchase. Where available I use compensated affiliate links which are at no additional costs to you.


Lawn Fawn Christmas Tree Gatefold Card

Hello and Welcome! In todays video we will be creating a fun and festive Christmas Tree Gatefold Card! I can’t wait to show you how fun this is to create and also how you can adapt this technique to many of the dies you already own!

This card was inspired by the current Lawn Fawn Blog Challenge #65 – Fun With Dies! (Pictured below).

Thank you so much for joining me today! If you enjoyed todays video please select the “Like” button and “Subscribe”.

All of the supplies used in todays video are listed below.

  • Lawn Fawn Ho-Ho-Holidays Stamps and Dies
  • Lawn Fawn Say What? Christmas Critters Stamps and Dies
  • Lawn Fawn Outsides In Stitched Christmas Tree Stackables Dies
  • Lawn Fawn Mini String of Lights Dies
  • Lawn Fawn Stitched Simple Wavy Borders dies
  • Lawn Fawn Fawndamentals Bone Folder
  • Lawn Fawn Fawndamentals Glue Tube
  • Lawn Fawn Fawndamentals Glitter Pen
  • Lawn Fawn 1/4” Double-sided Tape
  • Lawn Fawn Fawndamentals Sparkle Cardstock Holiday
  • Lawn Fawn Fawndamentals Sparkle Cardstock Pixie Dust
  • Lawn Fawn Fawndamentals Cardstock 100lb Cilantro
  • Lawn Fawn Snowday Remix Petite Paper Pack 6”x6”
  • Zig Clean Color Real Brush Pens – Blender, Geranium Red, Sugared Almond Pink, Flesh Colour, Lt Blue, Turquoise Green, Lt Green, Deep Green, Lt Gray, Black
  • Versafine Onyx Black Ink Pad
  • Tim Holtz Distress Oxide Ink Pads – Pine Needles, Peacock Feathers
  • Tim Holtz Foam Applicator Tools
  • Tim Holtz Sizzix Sidekick Die Cutting Machine
  • Tim Holtz Mini-Snips 5”
  • Tim Holtz Paper Trimmer
  • Strathmore Bristol Smooth 100lb Cardstock
  • Sakura Gelly Roll Pen White
  • iCraft Purple Tape
  • Scotch Foam Mounting Tape
  • We R Memory Keepers Trim/Score Board