Category: Encouagement

“Love” Postage Stamp Card!

Hello and Welcome!

Watch video tutorial here!

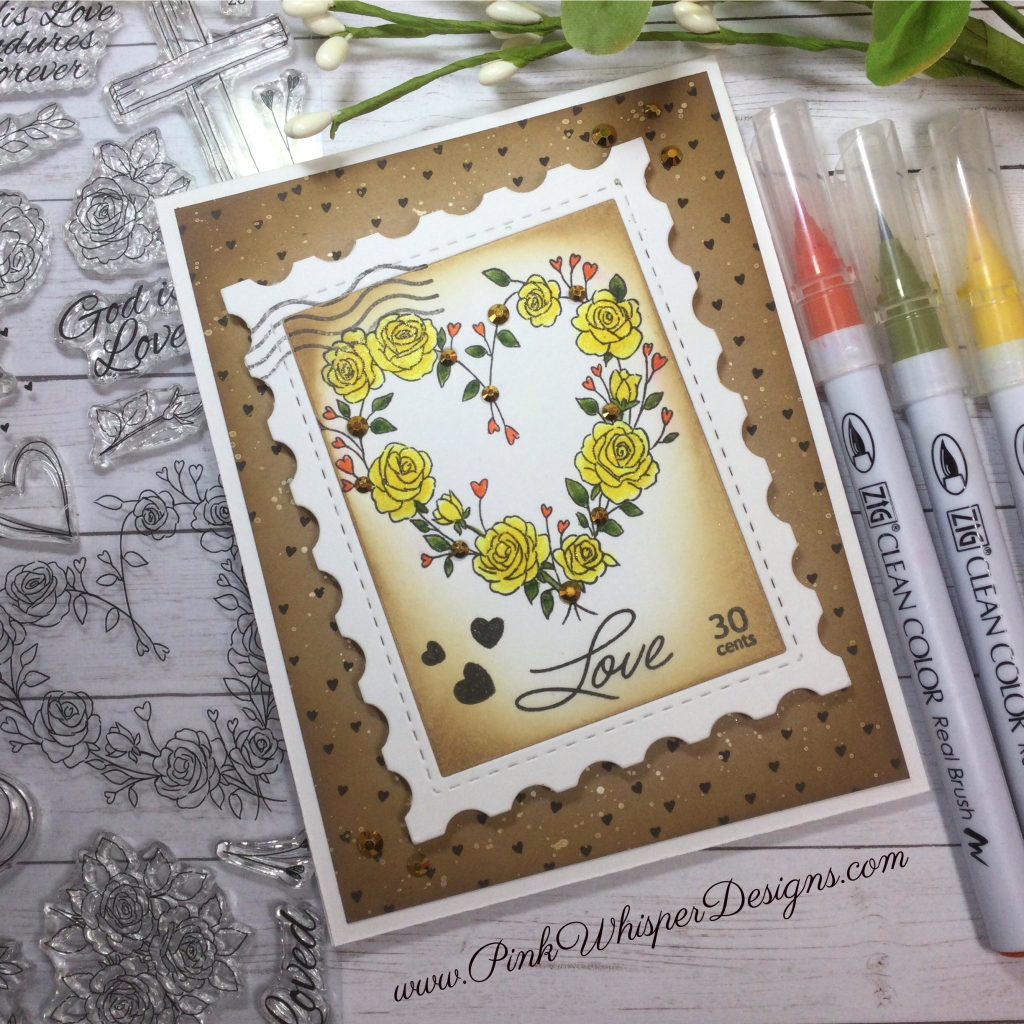
Let’s create our very own “Love” Postage Stamp today using the beautiful new Ai His Love Stamp Set (6150), which is part of the Bible Journaling Series. From this wonderful set we will be using the heart-shaped roses wreath, the “Love” sentiment, and the tiny hearts background stamp!

To begin, we will stamp and color the heart wreath using the Zig Clean Color Real Brush Pens in the following colors: Blender, Lemon Yellow, Yellow, Scarlet Red, Ever Green, Mid Green, Deep Green.

Once the wreath is colored, we can die cut the fun postal design using the Scrapbook.com Nested Stitched Stamp Die Set. This die will cut the center separately from the frame, which I absolutely love, because we can easily ink around the edges of the rectangle without having to mask off any of the postage stamp.

We will ink the edges using the Tim Holtz Distress Oxide Inks in Antique Linen and Gathered Twigs. This will frame the design nicely.

We can attach the frame and the center piece together using some 1/4″ Double Sided Tape and then we can pop up the entire postage stamp using some 3D Foam Tape.

But before we attach this to the card, let’s create the standard A2 size card base and a kraft colored layer which we will stamp with the tiny hearts background stamp from this same set.

Once the panel is stamped, we will spatter the panel with some Wink of Stella Clear Glitter and also some white ink. We will also add some of the Gathered Twigs ink around the edges.

Now let’s pop-up the postage stamp onto the card, on a little bit of an angle and add a few “gold” sparkly gems to the wreath and around the edges of the card. This will add some dimension and pretty sparkle!

Thank you so much for joining me today! If you enjoyed today’s video, please select the Like and Subscribe buttons and don’t forget to hit that notification bell so that you don’t miss a single video!

All of the supplies used in today’s video are listed below. Click the products below to make a purchase. Where available I use compensated affiliate links which are at no additional costs to you.

Art Impressions His Love Set (6150)

— https://tidd.ly/4qmSKOR (artimpressions.com)

Art Impressions Watercolor Travel Box (4924)

— https://tidd.ly/4mPuJhv (artimpressions.com)

Post-it Labeling and Cover-up Tape

— https://tidd.ly/3HMQnno (artimpressions.com)

Wink of Stella Clear Glitter Pen

— https://tidd.ly/4fPmRtA (artimpressions.com)

Dr. Ph. Martin’s Bleed Proof Ink – White

— https://tidd.ly/4h5wsNx (artimpressions.com)

Waffle Flower Postage Collage Stamps

— https://tidd.ly/49kRdmi (Scrapbook.com)

Scrapbook.com Nested Stitched Stamps Dies

— https://tidd.ly/44lOsho (Scrapbook.com)

Zig Clean Color Real Brush Pens

— https://tidd.ly/4lJhzBh (dickblick.com)

Buttons Galore and More – Jewelz – Holiday Mix (Gold)

— https://tidd.ly/4ghSzjp (Scrapbook.com)

Lawn Fawn Cardstock 100lb – Kraft

— https://tidd.ly/3VGJ7N2 (Scrapbook.com)

Tim Holtz Distress Oxide Ink Pad – Gathered Twigs

— https://tidd.ly/46Bmqir (Scrapbook.com)

Tim Holtz Distress Oxide Ink Pad – Antique Linen

— https://tidd.ly/3KP9PRr (Scrapbook.com)

Tim Holtz Craft Pick Tool

— https://tidd.ly/4pgRk8m (Scrapbook.com)

Tim Holtz Titanium Shears 9.5″

— https://tidd.ly/4fRZrUD (Scrapbook.com)

Hero Arts Blending Brush – Med

— https://tidd.ly/3JXuMZY (Scrapbook.com)

LDRS Creative – Stampendable Stamping Tool

— https://tidd.ly/43GOq3C (Scrapbook.com)

Versafine Ink Pad – Onyx Black

— https://tidd.ly/4lNt4HR (Scrapbook.com)

Lawn Fawn 1/4″ Double-sided Tape

— https://tidd.ly/4pOKcjT (Scrapbook.com)

Therm-O-Web 3D Foam Tape

— https://tidd.ly/4nkAOCg (Scrapbook.com)

Cricut Weeding Tool Kit

— https://tidd.ly/464NHdX (dickblick.com)

Nuvo Deluxe Adhesive

— https://tidd.ly/4lEYsIv (Scrapbook.com)

Pink&Main – Pick Up And Place Tool

— https://tidd.ly/46EwbfF (Scrapbook.com)

MISTI Mini

— https://tidd.ly/4pFz0Fd (Scrapbook.com)

Gina K Designs – Multi-Purpose Scoring Board Tool

— https://tidd.ly/3KZGPH5 (Scrapbook.com)

Heat-it Heat Tool

— https://tidd.ly/48bI1Af (Scrapbook.com)

Spellbinders Platinum 6 Die Cutting Machine

— https://tidd.ly/3VHU6pw (Scrapbook.com)

How To Create a Winter Scene – Bridge Card!

Hello and Welcome!

Watch video tutorial here!

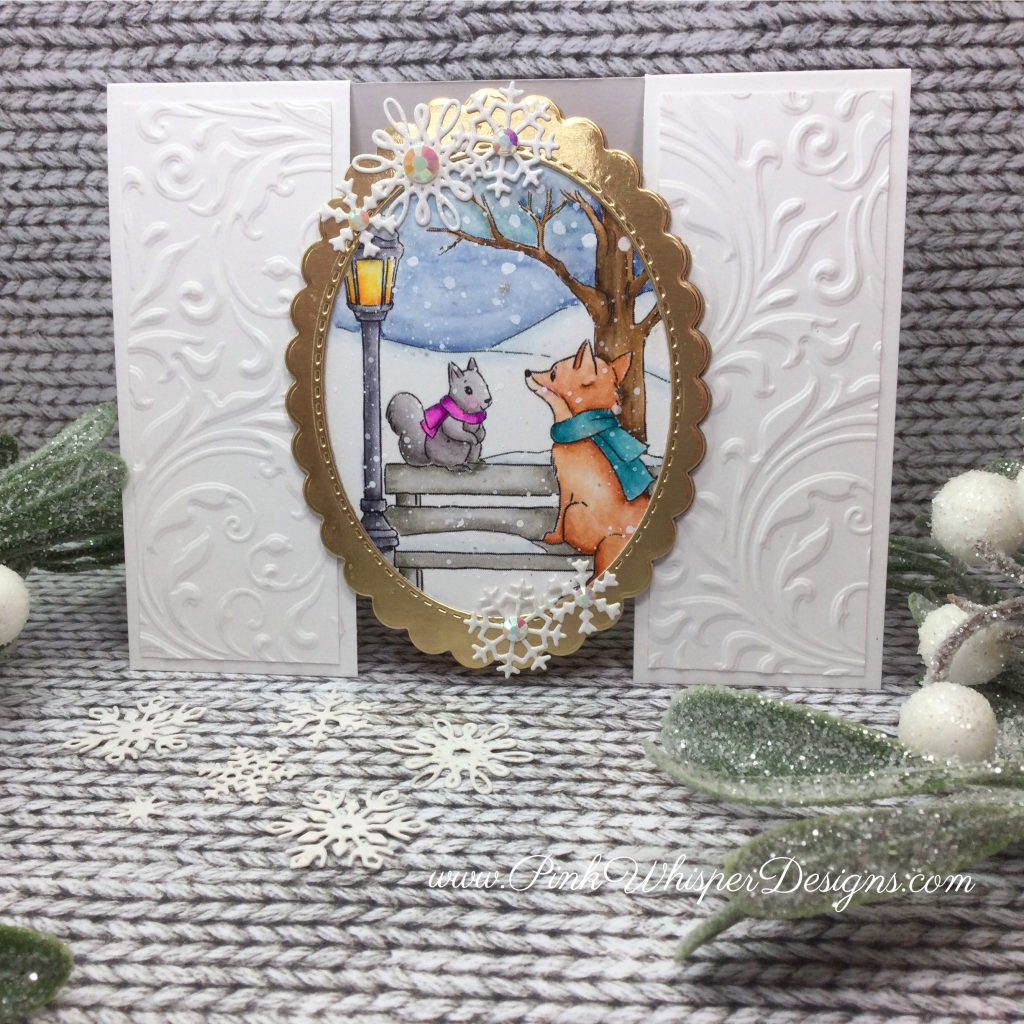
We are going to have some great fun today creating a pretty winter scene “bridge” card! Don’t worry it is super simple, and I will give you all of the instructions and dimensions in today’s video!

Let’s create this “bridge” card today using the brand-new Ai Woodland Bench Scene (6088) stamp! This set is part of the new Woodland Series Stamp Sets! There are six new sets in this series! Please note, there is a really great Holiday Lane Bundle Set which is currently available at a great discounted price and it includes the following:

(2) Woodland Christmas Paper Packs (6×6 & 6×9)

(6) Woodland Scene Stamps

(1) Holiday Lane Box Village Template Die Set

Let’s get started by stamping and coloring the images using the Zig Clean Color Real Brush Pens in the following colors: Blender, Sugared Almond Pink, Lt Beige, Yellow, Orange, Persian Green, Haze Blue, Aquamarine Blue, Dull Blue, Purple, Beige, Mid Brown, Platinum Brown, Green Gray, Lt Gray, Gray.

Next, we can create a pretty gold frame for this image using the Ai Oval Double Stitched Dies (5065) and the Ai Scalloped Oval Dies (6046).

To create the “bridge” design we will be cutting the center portion from a standard A2 size card. I will show you exactly how to do this in today’s video!

We will add a few embossed panels to each side of the card. This will not only add some elegance to the card but will also give a bit more stability to the card.

Now we will glue the oval frame to the front of the card…. only applying glue to the sides of the oval. I did back the framed oval with a solid gold oval to finish off the inside of the card as well; however you may skip this step if you wish.

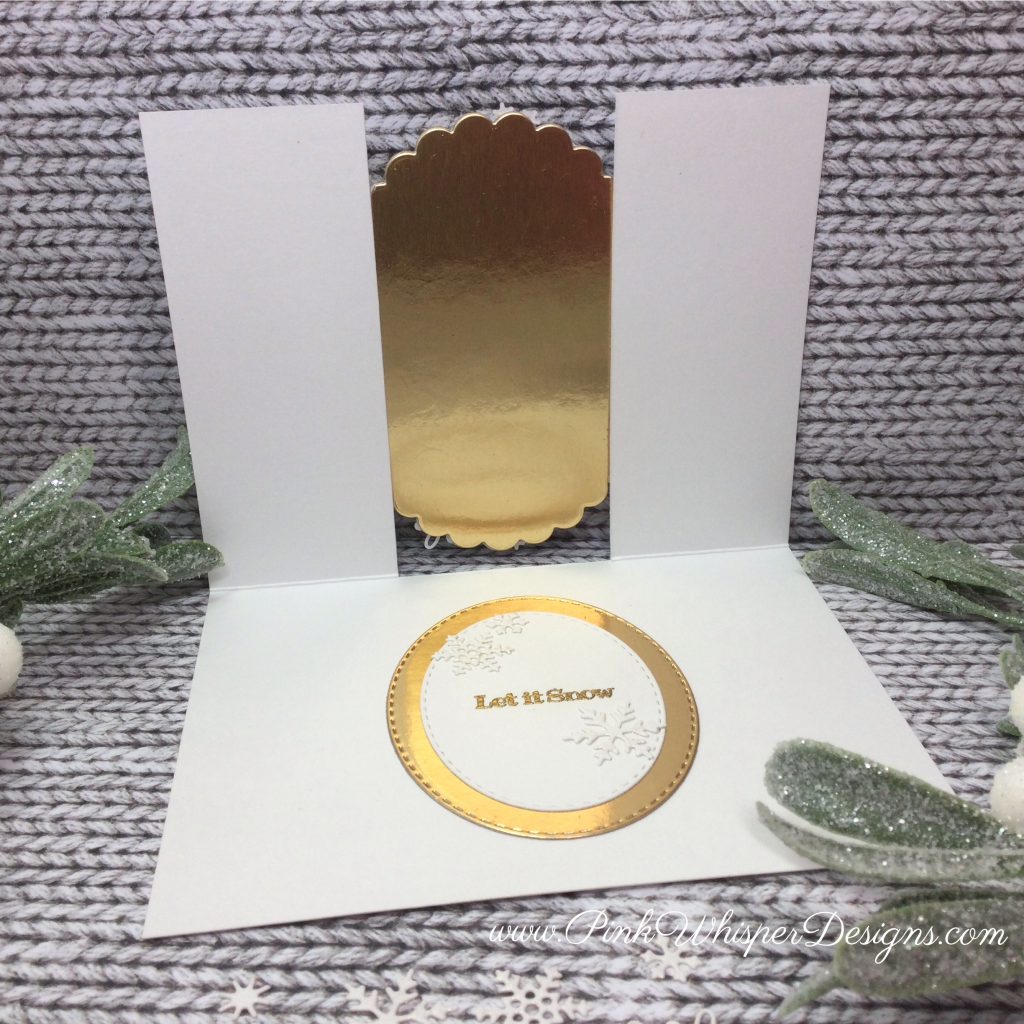
For the inside of the card, we will die cut two more stitched ovals from gold and white cardstock and stamp the sentiment. Let’s also emboss the sentiment with some gold embossing powder to continue that elegant look! I’ll show you a little trick for lining this up perfectly on the inside of the card!

For a finishing touch, we can add a few pretty glittery snowflakes to the front and inside of the card and a few sparkly gems in the center of the snowflakes!

Thank you so much for joining me today! If you enjoyed today’s video, please select the Like and Subscribe buttons and don’t forget to hit that notification bell so that you don’t miss a single video!

All of the supplies used in today’s video are listed below. Click the products below to make a purchase. Where available I use compensated affiliate links which are at no additional costs to you.

Art Impressions Woodland Bench Scene (6088)

— https://tidd.ly/43O6RmS (artimpressions.com)

Art Impressions Holiday Lane Bundle Set (c6145)

— https://tidd.ly/47LQqso (artimpressions.com)

Art Impressions Snowflake Frame Set (5782)

— https://tidd.ly/476H7Dg (artimpressions.com)

— https://tidd.ly/47ItBpF (Scrapbook.com)

Art Impressions Christmas Sentiments Set (5566)

— https://tidd.ly/3VvZls9 (artimpressions.com)

Art Impressions Oval Double Stitched Dies (5065)

— https://tidd.ly/47n5qyb (artimpressions.com)

Art Impressions Scalloped Oval Dies (6046)

— https://tidd.ly/4oJJd2W (artimpressions.com)

Art Impressions Nested Oval Dies (5727)

— https://tidd.ly/43LKLRZ (artimpressions.com)

Wink of Stella Glitter Pen – Clear

— https://tidd.ly/4fPmRtA (artimpressions.com)

Zig Clean Color Real Brush Pens

— https://tidd.ly/4lJhzBh (dickblick.com)

— https://tidd.ly/3JAxh4A (Scrapbook.com)

Tim Holtz Sizzix Texture Fades – Vault Flourish or Vault Botanical Large – A5

— https://tidd.ly/4qBWo7Y (Scrapbook.com)

Tim Holtz Craft Pick Tool

— https://tidd.ly/4pgRk8m (Scrapbook.com)

Tim Holtz Titanium Shears 9.5″

— https://tidd.ly/4fRZrUD (Scrapbook.com)

Harmony Precious Metals – 8.5 x 11 – 20 Pack – Gold

— https://tidd.ly/43bGfMx (Scrapbook.com)

Pink and Main – Pick Up & Place Tool

— https://tidd.ly/46EwbfF (Scrapbook.com)

Pinkfresh Studio Essentials Jewel Mix – White or Iridescent

— https://tidd.ly/43Kb2zZ (Scrapbook.com)

Spellbinders Tool n’ One

— https://tidd.ly/4216ULo (Scrapbook.com)

Spellbinders Platinum Scout Die Cutting Machine

— https://tidd.ly/3W1pHTg (Scrapbook.com)

Spellbinders Platinum 6 Die Cutting Machine

— https://tidd.ly/3VHU6pw (Scrapbook.com)

Pink & Main Anti-Static Brush

— https://tidd.ly/3HU5ED1 (Scrapbook.com)

Gina K. Acrylic Comfort Block Round

— https://tidd.ly/47Q3E8N (Scrapbook.com)

Spellbinders – Paper Trimmer and Scorer – 12 inch

— https://tidd.ly/4nMfAgM (Scrapbook.com)

Tombow Mono Power Mini Glue Tape

— https://tidd.ly/3V4xsHL (Scrapbook.com)

Nuvo Deluxe Adhesive

— https://tidd.ly/4lEYsIv (Scrapbook.com)

Lawn Fawn Double Sided 1/4″ Tape

— https://tidd.ly/4pOKcjT (Scrapbook.com)

Dress My Craft Mini Scoreboard

— https://tidd.ly/47RF6MY (Scrapbook.com)

MISTI Mini

— https://tidd.ly/3VfvmVg (Scrapbook.com)

We R Makers Detail Scissors

— https://tidd.ly/4mH1xJt (Scrapbook.com)

Versamark Watermark Ink Pad

— https://tidd.ly/3JZRJvF (Scrapbook.com)

Versafine Ink Pad – Onyx Black

— https://tidd.ly/4lNt4HR (Scrapbook.com)

Ranger Embossing Powder – Gold

— https://tidd.ly/4nqifg7 (Scrapbook.com)

Ranger Heat-it Craft Tool

— https://tidd.ly/48bI1Af (Scrapbook.com)

Cricut Weeding Tool Kit

— https://tidd.ly/464NHdX (dickblick.com)

Strathmore Bristol Smooth 100lb Cardstock

— https://tidd.ly/4hLBqzA (dickblick.com


Inspirational Floral Bookmarks w/ Keys!

Hello and Welcome!!!

Watch video tutorial here!!!

Let’s create some pretty inspirational bookmarks today using the new Ai Bible Bookmark Dies (6043). This set includes two bookmark dies and a few layering dies, as well as three separate word dies. We will die cut the bookmarks from some pretty patterned paper using the Ai Bible Journaling Paper Pack S1 (6082).

Now using some white cardstock, we can die cut the largest layering die. On these layers we will stamp our pretty floral designs using the Ai Hydrangea Floral Set (6062). While we are doing our stamping, we will also stamp the inspirational sentiment using the Ai You Are (6054) Stamp.

Now let’s color the floral images using the Zig Clean Color Real Brush Pens in the following colors: Blender, Sugared Almond Pink, Lt Violet, Lilac, Mid Green, Ever Green, Yellow.

To add the look of sky, and soften these panels a bit, we will ink around the edges of the panels using the TH Distress Oxide Ink in Tumbled Glass. Let’s also spatter the panels with this same ink. We will also add some Bundled Sage ink along the bottom of each panel.

Now we can add a bit of sparkle to the flowers using the Wink of Stella Clear Glitter Pen and we can also add some highlights with a white gel pen.

Next, we can attach these floral panels to the bookmarks and add a pretty white border using the Ai Decorative Belly Band Die Set (5804). This will give the look of a little fence!

Let’s add a sheer green ribbon to the top of each bookmark and a sparkly little key. The key will be die cut using the Ai BJ Icon Die Set (5987). This set has so many little icon images that can be used on lots of your cards. We will die cut the key from the sparkle cardstock for the front and back of the keys and from some white cardstock to thicken up the keys.

Now we can tie the keys to the tops of the bookmarks using some white hemp twine!

These are fun to make and give to your friends, family or co-workers who love to read. They make a wonderful gift when paired with a great book!

Thank you so much for joining me today! If you enjoyed today’s video, please select the Like and Subscribe buttons and don’t forget to hit that notification bell so that you don’t miss a single video!

All of the supplies used in today’s video are listed below. Click the products below to make a purchase. Where available I use compensated affiliate links which are at no additional costs to you.

Art Impressions Bible Bookmark Dies (6043)

— https://tidd.ly/4p5BrBE (artimpressions.com)

Art Impressions Decorative Belly Bands (5804)

— https://tidd.ly/3VdZLDw (artimpressions.com)

Art Impressions BJ Icon Die Set (5987)

— https://tidd.ly/4oSt0t5 (artimpressions.com)

Art Impressions Hydrangea Floral Set (6062)

— https://tidd.ly/4oSt0t5 (artimpressions.com)

Art Impressions You Are (6054)

— https://tidd.ly/3HS5awS (artimpressions.com)

Art Impressions Bible Journaling PP S1 (6082)

— https://tidd.ly/3JutCFi (artimpressions.com)

Steel Die Cutter

— https://tidd.ly/3Hrv4rp (artimpressions.com)

Wink of Stella Glitter Pen – Clear

— https://tidd.ly/4fPmRtA (artimpressions.com)

Lawn Fawn Sparkle Cardstock – Autumn or Spring Sparkle

— https://tidd.ly/4oRc3iE (Scrapbook.com)

Lawn Fawn Hemp Twine – White

— https://tidd.ly/4lHszza (Scrapbook.com)

Zig Clean Color Real Brush Pens

— https://tidd.ly/4lJhzBh (dickblick.com)

Tim Holtz Distress Oxide Ink Pad – Tumbled Glass

— https://tidd.ly/4mAknSC (Scrapbook.com)

Tim Holtz Distress Oxide Ink Pad -Bundled Sage

— https://tidd.ly/4mAknSC (Scrapbook.com)

Tim Holtz Titanium Shears 9.5″

— https://tidd.ly/4fRZrUD (Scrapbook.com)

Tim Holtz Distress Sprayer

— https://tidd.ly/3Jx3ucL (Scrapbook.com)

Sakura Gelly Roll Gel Pen – White

— https://tidd.ly/47Jfi5B (Scrapbook.com)

— https://tidd.ly/3VhxUlP (dickblick.com)

Nuvo Deluxe Adhesive

— https://tidd.ly/4lEYsIv (Scrapbook.com)

Hero Arts Blending Brush – Sm

— https://tidd.ly/4lFgjPt (Scrapbook.com)

Ranger Archival Ink Pad – Jet Black

— https://tidd.ly/4lPaNtP (Scrapbook.com)

We R Makers Detail Scissors

— https://tidd.ly/4mH1xJt (Scrapbook.com)

MISTI Mini

— https://tidd.ly/3VfvmVg (Scrapbook.com)

Strathmore Bristol Smooth 100lb Cardstock

— https://tidd.ly/45AGEJS (dickblick.com)

Cricut Weeding Tool Kit

— https://tidd.ly/464NHdX (dickblick.com)


Tim Holtz Mixed Media Stamps & Stencils w/ Glaze, Spritz & Embellishments!

Hello and Welcome!!!

Watch video tutorial here!!!

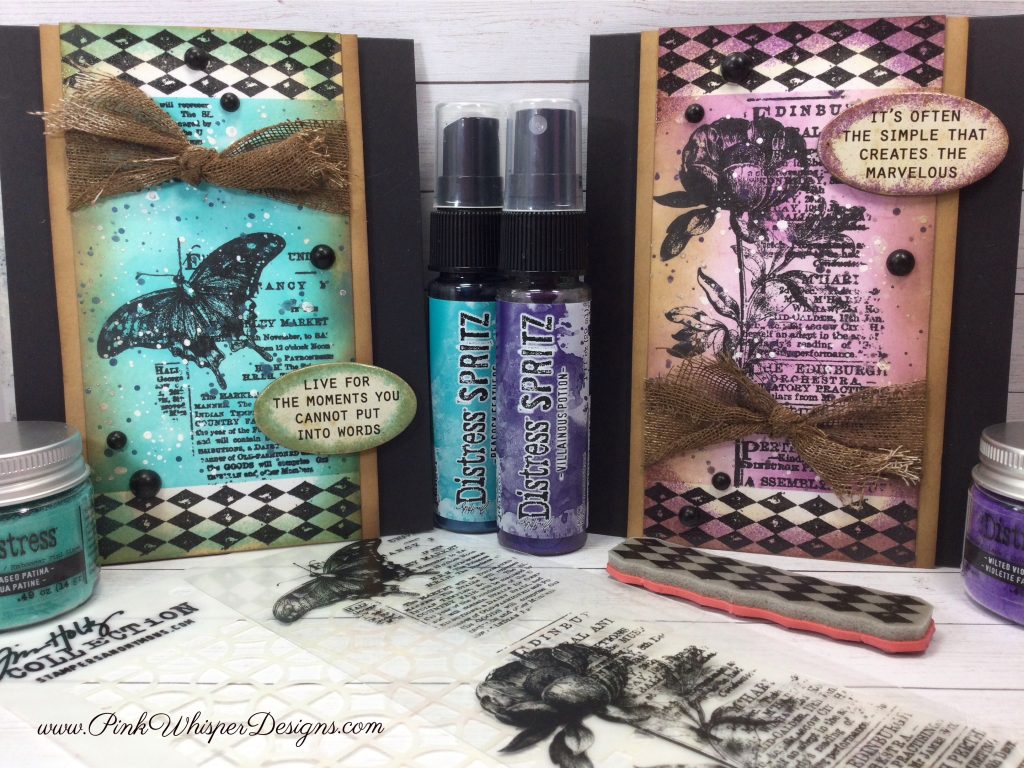
Today we will be playing with a Tim Holtz – Stampers Anonymous – Mixed Media Set (60) that includes two wonderful stamps and a stencil that has two different designs. You will get to see all of these in action because we will be using all of these pieces today!

To get started we will create a white card panel that we will use to stamp a pretty harlequin pattern. We will stamp this pattern on each side of this panel in Onyx Black ink. Then we will mask off this design using some Post-it Tape and start inking the center of the panel. For the first one we will use the TH Distress Oxide Ink in Tumbled Glass and Peacock Feathers … and for the second panel we will use Milled Lavender and Dusty Concord.

Now we can spatter the panels with some water and blot up the water with a paper towel. Let’s also grab that stencil set. We will lay the stencil over the panel and using a baby wipe or damp paper towel we will rub it over the top of the stencil. This will remove some of the ink and leave the stencil design behind!

Now, still leaving the Post-it Tape in place, we will stamp the butterfly/text image on the turquoise panel and the floral/text design on the lavender panel in that same black ink.

Next, let’s spatter the panels with the Dr. Ph. Martin’s Bleed Proof White Ink. Once that is dry, we will spatter again with the TH Distress Spritz in Villainous Potion (on Lavender panel) and Peacock Feathers (on the turquoise panel).

Now we can remove the Post-it Tape and ink the edges with some clear embossable ink and then add some TH Distress Glaze over top. Using Salvaged Patina and Wilted Violet. This glaze is so special and unique because it will allow anything underneath to still show through. It adds a pretty tinted glazed look and a nice texture!

Next, let’s add some TH Distress Oxide Ink in Vintage Photo around the edges of each panel.

Now we will take some TH idea-ology Mummy Cloth and dye it to match our vintage looking card. To do this, we will spray the Mummy Cloth with the TH Distress Oxide Spray in Vintage Photo. You’ll want to allow plenty of time for this to dry completely. Once it is dry, we will wrap it around each of the panels and tie a knot. You can fray the ends of the cloth for a more aged look!

Let’s create a black card base and a kraft cardstock layer and then add the colored panels that we created.

For the sentiment, we will grab a few quote chips and ink around the edges and then add that same Distress Glaze to each one. These can now be added to the cards.

For a finishing touch, we will sprinkle a few black gems on each of the panels!

Thank you so much for joining me today! If you enjoyed today’s video, please select the Like and Subscribe buttons and don’t forget to hit that notification bell so that you don’t miss a single video!

All of the supplies used in today’s video are listed below. Click the products below to make a purchase. Where available I use compensated affiliate links which are at no additional costs to you.

Tim Holtz Stampers Anonymous – Stamps/Stencils Set – Mixed Media 60

— https://shrsl.com/4xji6 (Scrapbook.com)

Tim Holtz Stampers Anonymous – Rubber Stamp Set – Mini Muse

— https://shrsl.com/4xji5 (Scrapbook.com)

Tim Holtz idea-ology – Droplets, Halloween or Concord and 9th – Enamel Dots – Black

— https://shrsl.com/4xjia (Scrapbook.com)

Tim Holtz idea-ology – Mummy Cloth

— https://shrsl.com/4xjib (Scrapbook.com)

Tim Holtz idea-ology – Quote Chips, Labels

— https://shrsl.com/4xjid (Scrapbook.com)

Tim Holtz Distress Oxide Spray – Vintage Photo

— https://shrsl.com/4xjie (Scrapbook.com)

Tim Holtz Distress Spritz – Peacock Feathers

— https://shrsl.com/4xjih (Scrapbook.com)

Tim Holtz Distress Spritz – Villainous Potion

— https://shrsl.com/4xjii (Scrapbook.com)

Tim Holtz Distress Oxide Ink Pad – Vintage Photo

— https://shrsl.com/4xjij (Scrapbook.com)

Tim Holtz Distress Oxide Ink Pad – Milled Lavender

— https://shrsl.com/4xjik (Scrapbook.com)

Tim Holtz Distress Oxide Ink Pad – Dusty Concord

— https://shrsl.com/4xjil (Scrapbook.com)

Tim Holtz Distress Oxide Ink Pad – Salvaged Patina

— https://shrsl.com/4xjim (Scrapbook.com)

Tim Holtz Distress Oxide Ink Pad – Peacock Feathers

— https://shrsl.com/4xjin (Scrapbook.com)

Tim Holtz Distress Glaze – Salvaged Patina

— https://shrsl.com/4xjio (Scrapbook.com)

Tim Holtz Distress Glaze – Wilted Violet

— https://shrsl.com/4xjip (Scrapbook.com)

Tim Holtz Titanium Shears 9.5″

— https://shrsl.com/4xjiq (Scrapbook.com)

Tim Holtz Foam Applicator Tool

— https://shrsl.com/4xmpk (Scrapbook.com)

Tim Holtz Personal Paper Trimmer 8.5″

— https://shrsl.com/4xmpl (Scrapbook.com)

Tim Holtz Distress Sprayer

— https://shrsl.com/4xmpm (Scrapbook.com)

Tim Holtz Distress Kraft Heavystock

— https://shrsl.com/4xmpn (Scrapbook.com)

Ranger Multi Medium Matte

— https://shrsl.com/4xmpo (Scrapbook.com)

Ranger Heat it Craft Tool

— https://shrsl.com/4xmpp (Scrapbook.com)

Ranger Ink – Non Stick Craft Sheet – 15″x18″

— https://shrsl.com/4xmpr (Scrapbook.com)

Ranger Ink – Non-Stick Craft Sheet 9″x9″

— https://shrsl.com/4xmps (Scrapbook.com)

iCraft 3D Foam Tape

— https://shrsl.com/4xmpt (Scrapbook.com)

Hero Arts Blending Brush – Sm

— https://shrsl.com/4xmpu (Scrapbook.com)

Versamark Watermark Ink Pad

— https://shrsl.com/4xmpv (Scrapbook.com)

Versafine Ink Pad – Onyx Black

— https://shrsl.com/4xmpw (Scrapbook.com)

Tombow Mono Mini Glue Tape

— https://shrsl.com/4xmpx (Scrapbook.com)

MISTI Mini

— https://shrsl.com/4xmpy (Scrapbook.com)

Dress My Craft Mini Scoreboard

— https://shrsl.com/4xmpz (Scrapbook.com)

Scrapbook.com 1/4″ Double-sided Tape

— https://shrsl.com/4xmq0 (Scrapbook.com)

Nuvo Deluxe Adhesive

— https://shrsl.com/4xmq1 (Scrapbook.com)

LDRS Creative – Stampendable Stamping Tool – Black

— https://shrsl.com/4xmq2 (Scrapbook.com)

Post-it Labeling and Cover-up Tape

— https://shrsl.com/4xmq3 (artimpressions.com)

Dr. Ph. Martin’s Bleed Proof Ink – White

— https://shrsl.com/4xmq4 (artimpressions.com)

Marvy Jewel Picker

— https://shrsl.com/4xmq5 (Scrapbook.com)

Cricut Weeding Tool Kit

— https://shrsl.com/4xmq7 (Scrapbook.com)

Strathmore Bristol Smooth 100lb Cardstock

— https://shrsl.com/4xmq8 (Scrapbook.com)