Hello and Welcome!!!
Watch video tutorial here!!!
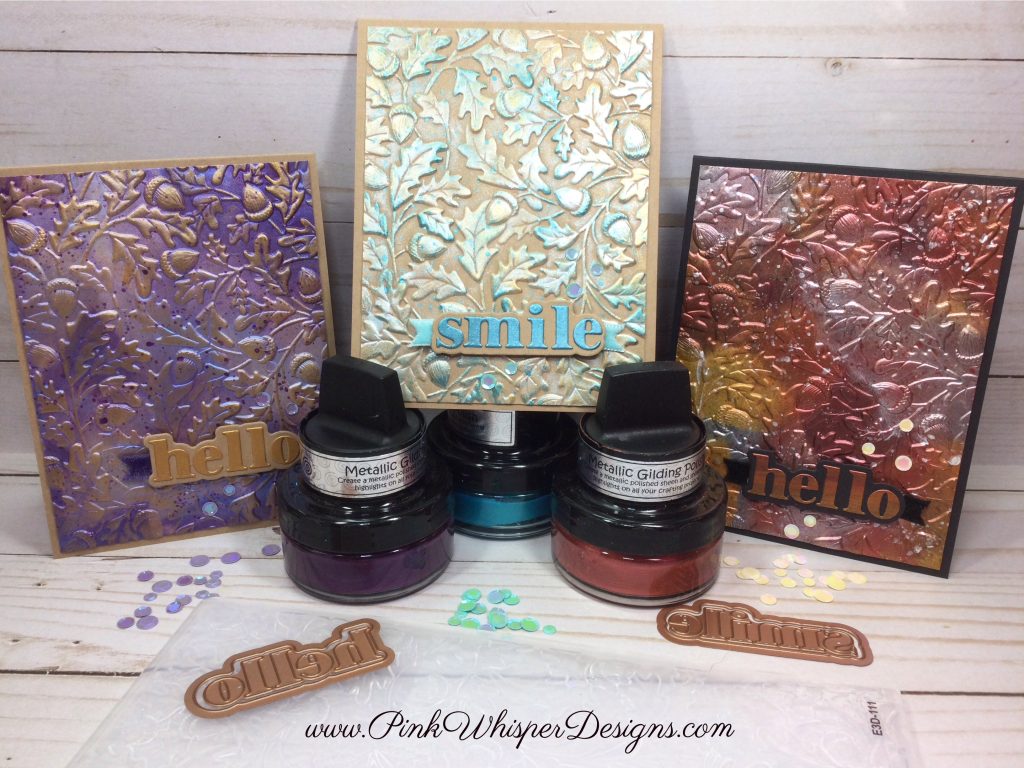
I thought it would be fun to go back to a product that I haven’t used in a while which is the Creative Expressions Metallic Gilding Polish! These polishes are so beautiful, fun and easy to use. We will be combining these gilding polishes with a gorgeous Spellbinders Oak Forest 3D Embossing Folder, a new set of Spellbinders “Hello Smile” Dies, and some pretty Spellbinders Opalescent Sequins!
I have done a few other videos using this product which I will link for you down below if you would like to check those out.
We will be using the Gilding Polish in a few different ways today. For the first one we will use some kraft cardstock and run it through the die cutting machine with the Oak Forest embossing folder. Then we will add some Metallic Gilding Polish over the top. I’ll talk about some tricks and tips for using this product throughout the video.
For the next card panel, we will begin by inking the kraft cardstock and then running it through the die cutting machine with that same embossing folder. So now we will have lots of color in the background and we can add just a few highlights to the tops of the images.
For the third card panel, we will be using a black cardstock. You will love how these metallics really pop on the black color and then we can add a few highlights to the tops of the images here as well.
For all of the card panels we will use the Metallic Gilding Polish to spatter the background with the coordinating ink colors.
Next, we can die cut the sentiments (Hello and Smile) and for the lettering on the sentiments we will ink some cardstock so that it will match the backgrounds beautifully. This will add that same metallic shimmer to the letters! We can go ahead and die cut these and assemble them with a bit of velvet ribbon and pop them up with some foam squares.
Finally, let’s add some pretty Spellbinders Opalescent Sequins in Aura, Purple and Teal!
Here are a few other videos that I have done using the Gilding Polish that you might enjoy:
Thank you so much for joining me today! If you enjoyed today’s video, please select the Like and Subscribe buttons and don’t forget to hit that notification bell so that you don’t miss a single video!
All of the supplies used in today’s video are listed below. Click the products below to make a purchase. Where available I use compensated affiliate links which are at no additional costs to you.
Spellbinders 3D Embossing Folder – Oak Forest
— https://shrsl.com/4quvc (Scrapbook.com)
Spellbinders Etched Dies – Hello Smile
— https://shrsl.com/4quvf (Scrapbook.com)
Spellbinders Color Essentials Sequins – Opalescent Teal
— https://shrsl.com/4quvh (Scrapbook.com)
Spellbinders Color Essentials Sequins – Opalescent Aura
— https://shrsl.com/4quvk (Scrapbook.com)
Spellbinders Color Essentials Sequins – Opalescent Purple
— https://shrsl.com/4quvm (Scrapbook.com)
Spellbinders Platinum 6 Die Cutting Machine
— https://shrsl.com/4qxvo (Scrapbook.com)
Spellbinders Universal Plate System
— https://shrsl.com/4qxvr (Scrapbook.com)
Spellbinders Platinum Scout Die Cutting Machine
— https://shrsl.com/4qxvl (Scrapbook.com)
Cosmic Shimmer Metallic Gilding Polish – Pearl Lustre
— https://shrsl.com/4qxvs (Scrapbook.com)
Cosmic Shimmer Metallic Gilding Polish – Rich Red
— https://shrsl.com/4qxvu (Scrapbook.com)
Cosmic Shimmer Metallic Gilding Polish – Tangy Tangerine
— https://shrsl.com/4qxvx (Scrapbook.com)
Cosmic Shimmer Metallic Gilding Polish – Ocean Teal
— https://shrsl.com/4qxvy (Scrapbook.com)
Cosmic Shimmer Metallic Gilding Polish – Blue Wave
— https://shrsl.com/4qxvz (Scrapbook.com)
Cosmic Shimmer Metallic Gilding Polish – Dark Cherry
— https://shrsl.com/4qxw0 (Scrapbook.com)
Cosmic Shimmer Metallic Gilding Polish – Coral Sands
— https://shrsl.com/4qxw1 (Scrapbook.com)
Cosmic Shimmer Metallic Gilding Polish – Gold Treasure
— https://shrsl.com/4qxw2 (Scrapbook.com)
Cosmic Shimmer Metallic Gilding Polish – Mint
— https://shrsl.com/4qxw4 (Scrapbook.com)
Lawn Fawn Cardstock 100lb – Black Licorice
— https://shrsl.com/4qxwc (Scrapbook.com)
Tim Holtz Distress Kraft Heavystock
— https://shrsl.com/4qxwd (Scrapbook.com)
Tim Holtz Velvet Trims – Neutral
— https://shrsl.com/4qxwf (Scrapbook.com)
Tim Holtz Velvet Trims – Cool
— https://shrsl.com/4qxwh (Scrapbook.com)
Tim Holtz Paper Trimmer
— https://shrsl.com/4qxwi (Scrapbook.com)
Tim Holtz Retractable Pick Tool
— https://shrsl.com/4qxwl (Scrapbook.com)
Tim Holtz Mini Snips 5″
— https://shrsl.com/4qxwm (Scrapbook.com)
Tim Holtz Distress Sprayer
— https://shrsl.com/4qxwo (Scrapbook.com)
Pinkfresh Studio Triangle Tray
— https://shrsl.com/4qxwq (Scrapbook.com)
Scrapbook.com 1/4″ Double-sided Tape
— https://shrsl.com/4qxwr (Scrapbook.com)
Scrapbook.com Double-sided Foam Squares – Large 2mm
— https://shrsl.com/4qxws (Scrapbook.com)
Nuvo Deluxe Adhesive
— https://shrsl.com/4qxwu (Scrapbook.com)
Nuvo Precision Tips
— https://shrsl.com/4qxwv (Scrapbook.com)
Cricut Weeding Tool Kit
— https://shrsl.com/4qxww (dickblick.com)
Marvy Jewel Picker
— https://shrsl.com/4qxwy (dickblick.com)
Dress My Craft Mini Scoreboard
— https://shrsl.com/4qxwz (Scrapbook.com)
Tim Holtz Glass Mixed Media
— https://shrsl.com/4qxx1 (Scrapbook.com)


